Sunday 30 March 2014

Polish Party - Spring

March's Polish Party theme is SPRING! I love spring.  I am not a fan of winter, and often find the winter months very depressing. When spring starts coming round, and the days are longer, the trees start budding and the flowers start coming out, I always perk up a lot. 


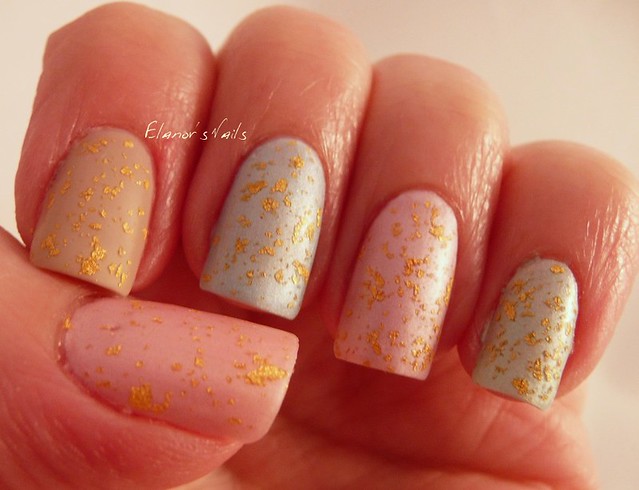
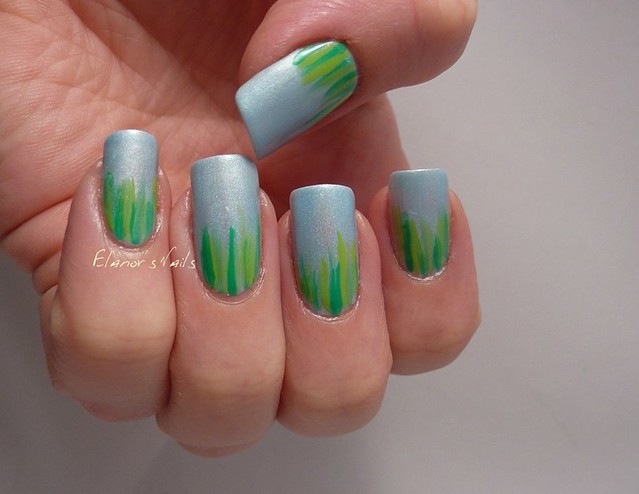
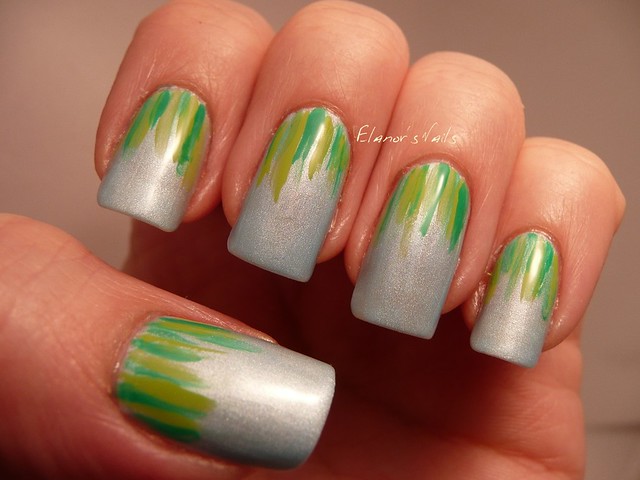
For quite a while I've been wanting to copy The Nailasaurus's waterfall nails, but with a blue/green colour scheme to make grass against a blue sky, and I thought this would be the perfect opportunity.  The blue is Barry M Mist, from the Silk collection - this is two coats. I love the silks, they're so pretty and apply and dry so well!


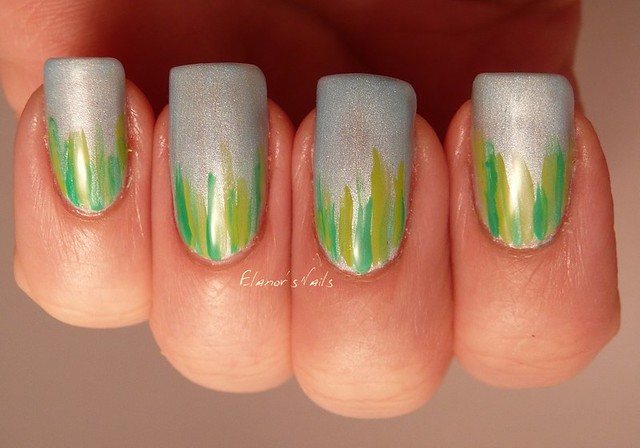
I then added the grass using all Barry M polishes - Spring Green, Meadow and Key Lime - and a thin striping brush. I think perhaps my brush wasn't as fine as it should have been, as the lines aren't as thin or as delicate as I'd have liked, but this does look pretty at arm's length.


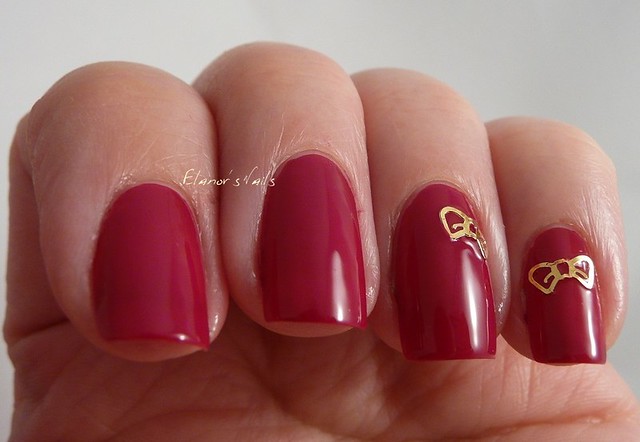
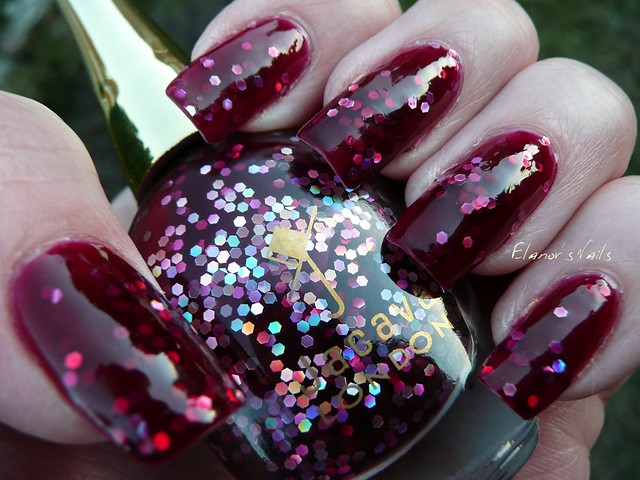
You can see all the other Polish Party posts this month here:  


Saturday 29 March 2014

China Glaze Glimmer More

I was in my favourite nail varnish shop the other day, having heard that they'd got the Opi Sheer Tints in, and while I was there, spotted the new China Glaze Surprise collection and couldn't resist this one, Glimmer More.  When I first saw swatches of this collection online, I have to say I didn't really like the look of it - I'm not a fan of 'untidy' looking glitter somehow. But this just looked so pretty in the bottle that I couldn't resist!


I thought I would try this out over the Models Own Hypergel, Coral Glaze.  You may remember my previous post about the Hypergels, and the difficulties I had with them not drying. I did actually write to Models Own, who replied to say that they'd not heard of this issue before, but that they would investigate, and that I should make sure my nails were clean and dry before applying nail varnish. They did send me three replacement polishes though (I chose Bubblegum Ice Neon, and a couple of jelly glitters - posts to come later) which was nice.   But I was determined to try the Hypergels again one last time, just in case. 


This time I used a different base coat to my usual one, in case the Hypergel didn't like my base. I made sure my nails were scrupulously clean. I waited an hour between the first coat and the second. Then I waited another hour before adding Glimmer More as a glitter topcoat. This is a very pretty glitter - there's sparkly magenta hex glitter, and larger matte white, pale orange and yellow hex pieces. I like the contrast between the sparkly and the matte glitter, I think it's really pretty. This is awkward to apply though, because of the skinny brush; you do have to dab this around quite a lot. 

I like the way this looks, although I don't love it. I think Glimmer More would look better over a pretty pastel pink though. And then, I thought that as it had been several (at least three!) hours since I applied the first coat of Coral Glaze, I'd see how well it had dried... 


Yep. It just wiped off. So I officially give up on the Hypergels! They just Do Not Work for me.  

w7 Mystery Blue-Green Shimmer Polish

This is the last polish from my giant w7 haul from a couple of weekends ago. Unfortunately, it's another one where the label came off when I cleaned up the giant spill, so I don't know what this one's called! However, it is a really pretty bluey green shimmery glass fleck polish.


This is three thin coats on each nail, except on my ring finger, which is one coat over black.  The formula on this is quite sheer and runny, so I wanted to see if putting it over black was easier, or if it looked as good.


I think it works fine over black! The shimmer isn't less pronounced than on the other nails, and it was easier to apply - although there was no problem on the other nails, it just meant using fewer coats. 


Whilst it isn't very springlike, I like how this polish looks. I wish the greeny blue shimmer was a bit more obvious in all lights, but I think this will look great in the winter!

This polish was provided for review. Opinions and words are entirely my own.

Monday 24 March 2014

Thermal Purple with Iridescent Topcoat AND Metallic Stamping

Today's design might as well have the kitchen sink in there!  I started with two coats of Ferity MissMatch Purple Passion, a fabulous pink to purple temperature sensitive polish which I reviewed here and here

Not content with just the colour changing polish, I added a coat of China Glaze Travel in Colour, an iridescent topcoat from the 2013 Holiglaze collection.  It's so pretty! It adds a lovely shimmery sparkly effect. 

I then stamped over that with a plaid design from the MoYou London Pro XL 01 plate, and Barry M Lilac Foil.  

I'm pretty pleased with this one! The photo above is how it looks when cold - a lovely dark shimmery purple all over.  As it warms up, it gets bright pink, so that at normal room temperature, it's pink on the nail bed, and purple at the tips. 
Do you like this look?


Sunday 23 March 2014

Red and White Mish Mash - a Bit of a Fail

Today I wanted to do a mish-mash skittle look with red and white polishes. I started with Jacava Toffee Apple, and Essie Blanc on my ring finger. I then added some stamping using MoYou London Pro XL plate 01 and Konad white.  I also freehanded some roses on my ring finger using Jacava Toffee Apple and Jacava Crimson Crush, with some Barry M Spring Green.  I did the dots on my index finger with a Barry M nail art pen.


I hate this look! I like most of the nails individually (ish) but not together.  I really like the wide stipes on my thumb - that's my favourite part of the stamping plate I think.  I like the index finger, but I don't think it goes with the others. I like the middle finger's narrow stripes, but I really don't like how it makes the nail look not-red. It definitely looked more white than red at arm's length. Plus it looks as though the red has stained badly round the cuticle, or that I haven't cleaned up, and I swear that's not true! I think what happened is that when I stamped, the raised cuticle at the edge created a cushion which meant the white stamping didn't reach all the way to the edge. I don't like my roses at all - the colours don't go with the other nails, there are too many of them, and the leaves are messy.  And don't even go there with my little finger! Initially these were nice white dots from the stamping plate, but I thought the nail looked too white, so I dotted more red on. Except that I was too lazy to get my dotting tool, and just used the edge of the brush I used for the roses, and it's a hideous mess. 

Oh well, you live and learn!  This all came off again straight away.    

Friday 21 March 2014

Friday Challenge - Sweet Shop!

This week's Friday Challenge is... Sweet Shop!


I wanted to go for a sweets-inspired look, rather than actually painting sweets themselves onto my nails. 


For this design I used two coats of Barry M Blossom from the Silks collection (my bottle is down to 2/3 full! I'm going to need a back-up!) on three fingers, and two coats of Jacava Raspberry Bavarois on my thumb and ring fingers. 


I then added studs to the Blossom fingers. The studs are from the Born Pretty Store, and are stuck down with topcoat.   I used striping tape to tape off stripes on my Raspberry Bavarois fingers and then added a coat of Barry M Princess, the textured pinky gold glitter, for a sugary texture. 


I'm quite pleased with this look. It's pretty and sweet, and I think it meets the brief! I was really pleased with how well the studs stayed put too - they've been on for 24 hours now and have survived intact, which doesn't always happen with studs and topcoat for me.


Thursday 20 March 2014

Jacava Smooth Liquid Gold with Rose Decals

This is the last of my latest Jacava polishes, Smooth Liquid Gold. I decided to pair this up with some water decals from the Born Pretty Store to make it a super pretty design for a dull day at work.


This is two coats of Smooth Liquid Gold.


This is a really pretty gold polish. As you may know, I'm a HUGE fan of gold nail varnish! This one isn't going to be one of my top favourite golds, but then I do have very high standards for gold! Having said that, it is a very pretty shade. 


Application is a little trickier than most Jacava polishes that I've tried before, but that's due to the type of polish - it's a touch thicker than most creme polishes, and can easily look a bit brushstrokey. However, it's a lovely smooth, even consistency, and it really does glow in the right light.


The decals were ones I initially reviewed here. I love these roses, they're just so pretty! 

This polish was provided for review. See my Disclaimer for more detail.

Monday 17 March 2014

Barry M Aquarium Collection - Caspian

This is the second of the Barry M Aquarium collection that I bought last week - Caspian. 


This is three thin coats, with no topcoat. 


Caspian is a really pretty gold foil. To be honest, I can't really see any duochrome in there, apart from a slight pinkish tinge to it, especially in the bottle, but it is a really pretty colour, and I found it very flattering with my skin tone. 


The formula is good - application is smooth, and this dries really well. 


I find that these types of foils sometimes wear very quickly at the tips, but after a day at work with plenty of typing, it's still looking perfect. 


These are on sale in Superdrug and on Barry M's website for £3.99


Sunday 16 March 2014

Mini Eggs Nails! Matte Pastel Skittle with Gold Leaf

Just a quick post today - these were inspired by the mini eggs I've been eating!

This is a pastel skittle, using Essie Sand Tropez, and four of the Barry M Silks, Meadow, Blossom, Heather and Mist. I then added a generous coat of Opi The Man with the Golden Gun. When that was dry, I mattified it all using Rimmel Pro matte topcoat. 

I love how this looks!
I just realised that I did an almost identical design this time last year too! I prefer the colours this time though, as they're paler and more like actual mini eggs. I realise that Mini Eggs don't actually have gold flecks, but I think gold is prettier than brown, so that's what I used. I think Mini Eggs would look good with gold leaf!

Saturday 15 March 2014

Jacava Raspberry Ripple

I have quite a lot of Jacava polishes! And quite a lot of them are in the same colour range! But look how pretty they are!

Today I have Raspberry Ripple to show you. This is two coats, without topcoat. 

Raspberry Ripple is a lovely bright red creme. Now I look at the photo of all the bottles, I can't work out which one it is! I think it's the one bottom left, but it's hard to be certain!

Application and formula is excellent as always with Jacava. I didn't need to do any cleanup at all, as the brush is so perfect, and the polish is so smooth and even. I really do love the quality of Jacava. Every single one I've tried so far has been superb. 

I decided to jazz these up a bit, and added a couple of gold bows that were part of a set from Born Pretty Store (see original review here). In fact, these studs were the very first thing I ever got from the Born Pretty Store, just over a year ago. I stuck these on just by adding them over a fresh coat of Seche Vite, and then topcoating again afterwards.

You can buy Jacava polishes from Jacava's website and from Amazon UK. The standard price is £14.50, but they often have sales on the Jacava website, and on Amazon, certain colours are £11.  All Jacava polishes are 8-free, meaning they don't contain Formaldehyde, Formaldehyde Resin, Parabens, Camphor, Toluene, DBP, Animal Ingredients or Phthalates. 

This polish was provided for review. See my Disclaimer page for more information.


Barry M Aquarium Collection - Mediterranean

Barry M's latest new collection is the Aquarium collection: six sea-related colours. There are 4 duochromes and two shard glitters.  I chose two of the duochromes, Caspian on the left, and Mediterranean on the right.


Aren't they pretty?  First up, I tried out Mediterranean, the pinky-gold one.  And just to warn you - this is going to be photo heavy, because it's PRETTY!


Did I say pretty? I mean DROP DEAD GORGEOUS!


This is three thin coats of Mediterranean, with no topcoat. Two coats would probably have been fine, but it's quite a sheer formula, so I added a third.  This is a lovely pinky gold foil that moves between deep pink to bright orange, via peachy gold tones. I ran round the house taking photos in every different light I could find!


Formula is fine - this is smooth and even, dries well and applies easily. The first coat is a bit sheer, as this is a foil, so the particles don't cover the entire nail straight away. 


It looks great in the sun. 


It looks great in the shade. 


I think it's a really flattering colour.


I think I love this polish!  Because I can never leave well alone, I decided to also stamp over it.  I used Barry M Gold Foil and MoYou London Nature 02 stamping plate. 

I used the peacock tail section of the plate to get this feather design. I think the combination works really well!

I like the subtle contrast between Mediterranean and the gold stamping - it's not too obvious, but it is pretty.

The Aquarium collection is out now in Superdrug, and costs £3.99 each. However, I bought these two yesterday on a 2-for-£6 deal, so you can get them cheaper.


Friday 14 March 2014

Friday Challenge - Graffiti!

This week's Friday challenge is... GRAFFITI.


My favourite ever piece of graffiti is this - I snapped this photo in my town centre about 5 years ago. It's still there, and every so often I see it, and smile. 

 However, I decided not to recreate this on my nails.  Instead I did this.


This was done by splodging on a mess of a combination of Barry M Greenberry, Satsuma and Cyan Blue, and Models Own Bubblegum. Then I added a coat of Layla Bubbly Effect in Black Forest. On the ring fingers I did my initial (yes - Elanor isn't actually my real name!) in what is meant to be a graffiti-esque style, using Barry M Nail Art Pens in white, pink and silver, over a base of W7 Black. Doing my right hand was hard!


I was a bit disappointed with how black these are - I had hoped more colour would show through. I'd forgotten that the Layla Bubbly Effect needs a very VERY thin coat! My right hand looked lots better, because I did that second. I can't photograph that though! However, I'm still pretty pleased with these, as I do think they look quite graffiti-ish.

(You'll notice that my nails are all short and horrid - I ripped a nail off in a door at work, and had to cut them all short to match. Booooo!)


Tuesday 11 March 2014

Jacava Regent Street

When the new Jacava colours were announced, THIS was the one I most wanted to try. I mean - just look at it in the bottle!


This is Jacava Regent Street, a stunning berry coloured jelly polish with glitter hex pieces.  This is three coats, with topcoat. 


Application for this one is a little trickier than most other Jacava polishes, but only because the glitter can be a bit uneven, so you have to dab it around a bit to spread it out. 


Oh my word though, isn't it stunning?!  I tested this out on a swatch wheel over black and over purple creme, and that's lovely too, but this jelly sandwich effect of the polish on its own was just too gorgeous to not show you Regent Street this way. 


I really like the way this is a sparkly glitter, without being too over the top and blingy. The jelly base is so juicy and vibrant, I think it would look really good as a jelly polish without the glitter in too. 


I snapped this last photo in the evening sunshine as I got home from work, because I noticed that it was looking especially beautiful. I was hurrying, so didn't moisturise my skin, apologies for the dry cuticles. 

Incidentally, I've been using the Jacava topcoat for the last week too, and I really like it a lot. It's a clear topcoat with UV inhibitor, which apparently helps keep white polish white for longer in French manis. I don't usually wear polish for more than a couple of days anyway, so that part doesn't really mean much to me, but it is an excellent topcoat. It's smooth, silky, dries quickly to a super glossy finish, and protects the polish really well. All that makes it as good as my beloved Seche Vite. It also has the lovely Jacava brush of course, and is 8-free (which Seche most definitely isn't - I dread to think what's in that!) so that makes it better than Seche in my opinion!


This polish was provided for review. See my Disclaimer for more details. 


Related Posts Plugin for WordPress, Blogger...