Last week I bought my first stamping plates from Bundle Monster - the first plates I've bought that aren't from MoYou London in a very long time. I bought a set of 5 blogger plates, and the nails in this post use the plate by YaGala.
I started with a base of Barry M Golden Sands, and then stamped using Konad Black and Bundle Monster BM-XL208 and a lacey design.
I wore these for a couple of days without topcoat, and then for another couple of days with topcoat. I like how they look in closeup, but at arms' length I felt they looked sort of grubby... Whether that was the colour combination or what, I'm not sure.
Today's nails are an autumnal waterfall design. I started with two coats of Barry M's new black gelly, Black Forest. I was SO excited to hear that Barry M are finally doing a black in the gelly range - they've got so many colours and a really good formula, but so far no pure black. Anyway, it's finally here, and it's really nice.
Over the black, I then used a thin striping brush and added stripes of China Glaze Riveting and Colours by Llarowe The Heart Bleeds and Golden Rule.
I love how this came out! It's sparkly without being too over the top, and the colours blend together really nicely into an autumnal look.
What do you think?
I've posted before about how much I love the Crucible Theatre (see here for my previous nails) and I was there on Thursday night for Artistic Director Daniel Evans' leaving do, so I decided it was the perfect time to redo my Crucible nails.
I love the Crucible so much! It's my far my favourite theatre ever, and I go often (although not often enough for my liking!)
These are just a straightforward chevron skittle. I used nail vinyls from What's Up Nails to make these. The base colours are Barry M Blue Grape, Essence Flashy Pumpkin, Barry M Blood Orange, Illamasqua Prosperity and Barry M Key Lime. The black top colour is OPI 4 In the Morning.
I'm happy with how these came out. They're much tidier than my previous effort, and the colours are clearer.
Sorry for the lack of blog posts recently - I've been off and about jumping up and down at Springsteen concerts. It's been far too long since I got the chance!
This tour is based around the 35th anniversary River boxset that Bruce released last year, and the album sleeve of the original River album is what I used as (very loose) inspiration for my nails.
I decided to use the colour scheme, and my favourite MoYou London stamping plate (Rockstar 01). I started with a base of OPI 4 In the Morning, and then stamped using the guitar designs and Konad White. I then painted over the white with OPI Turquoise Aesthetic, from the Color Paints collection, to get the teal-blue colour. I then freehanded the plaid thumbnail using a base of Barry M Coconut and Chai, and OPI 4 In the Morning.
The plaid came out a bit rough round the edges, but somehow that seems appropriate for Bruce...
I wouldn't normally take blog photos in the evening sunlight like this, but again, it seemed appropriate for Bruce. There's something about that evening light around sunset that just goes perfectly with a Bruce show...
You can see my previous Springsteen nails here.
Today I'm wearing another Barry M Gelly, Sugar Plum. This isn't one of the new ones, but it is new to me. It's a lovely bright, happy pink, with a touch of purple to it.
I taped off the tips with sellotape, and stamped using Konad Black and Born Pretty plate BP-21.
The black smeared slightly in places when I added topcoat. I wish I could find a black that didn't do that!
Still, I'm quite pleased with how these look, and the smears aren't obvious unless you look really closely.
Today I'm trying out some more full-nail water decals from Born Pretty Store. These are a tartan design (which BPS call "colourful grid pattern", lol!) in a red and black colour.
As you can see, you get one large sheet of water decal, which you can cut into any size or shape you want. The decals are available here for $2.18. My pattern is #14, which on the website looks pink and brown, but which is actually a much nicer red and black design.
I didn't think there would be enough decal to cover all ten nails, so I decided to do three nails on each hand and do something else on the other nails.
I started with a base of plain red on three nails, and painted the other two with Zoya Storm, a pretty sparkly black. I then put the decals over the red nails. This meant that the yellow/orange part of the design wasn't actually visible over the red, but I think I prefer the plain red and black that I ended up with.
Application is really easy - just cut to an approximate size, drop into a bowl of water, slide off the card and apply to the nail. Then dab dry with some paper towel, and add topcoat. The topcoat melts off any of the decal overhanging the nail, and adds a super shiny finish to the nail.
I do wish the sheet had been a bit bigger, as I would have liked to have done all ten nails. As it was, I did six easily, and possibly have enough for two small nails to use later. It would not have been possible to do all ten of my nails though. But at that price, it's no hardship to buy two packs!
If you want to try these decals, or similar ones from Born Pretty Store, you can get 10% off using my discount code.
These decals were provided for my honest review. See my Disclaimer section for more information.
Sorry I've been missing for the last week! I've been properly poorly - had a very nasty bug which has wiped me out completely. I've done nothing but sleep, make hot water bottles and watch Say Yes to the Dress. But today I started feeling a bit better! I could tell, because the first sign was wanting to paint my nails!
I did a very simple look using two of the Barry M Gellys which I posted about a month ago. I wasn't a huge fan of the brushes or the staining last time, but these were a lot easier to use second time round.
I started with two coats of Black Cherry, the very dark red one. I then used tape to mark off long triangles, and painted a coat of the red glittery one, Sparkling Ruby over the top. Just for good measure, and because I have a glamorous evening ahead in my pyjamas, I added a sparkly red rhinestone.
I love how these look!
I think Sparkling Ruby looks so much better over the dark base - it's somehow a lot more sophisticated than in its pure bright red form.
I'm a bit shocked at how much my nails have grown recently too! They're looking really long! That makes me think they'll probably break very soon...
Today is NET Cancer Day and lots of the British Nail Bloggers are doing nails in support of this. I'd never heard of NET (neuroendocrine tumour) cancer until last year, when our nail blogger friend Emma (of Em's Little Corner)'s husband was diagnosed. Thankfully, he is on the mend.
The NET organisation uses the analogy of the zebra to raise awareness, effectively saying that if something looks like a horse and clops like a horse, the mostly likely chance is that it is a horse. However, it could possibly be a zebra, and so people shouldn't necessarily write symptoms off as the most likely cause, because it could be something else. Emma's post (see links below) explain it so much better than I can!
Anyway, on to the nails, which are pink and zebra, in honour of the NET Cancer logo.
I was a bit scared of doing zebra nails, because I've never done them before. I don't have any zebra stamping plates, so I had to freehand these. I was quite apprehensive!
I started with a base of two coats of Barry M Coconut on three nails, and two coats of Barry M Pink Punch on the other two. I then used a black Barry M nail art pen to freehand the zebra stripes. I also added a tiny French tip on the pink nails using Models Own Gold Chrome.
I topcoated over the pink nails, and used a matte topcoat over the zebra nails.
I am so pleased with how these turned out! My right hand is also not bad at all, so I'm really chuffed with myself! If I look at them too much, I start thinking they look like twigs instead of zebra stripes, so I'm trying not to look too closely!
A friend recently gave me a surprise present - look how cute this set is!
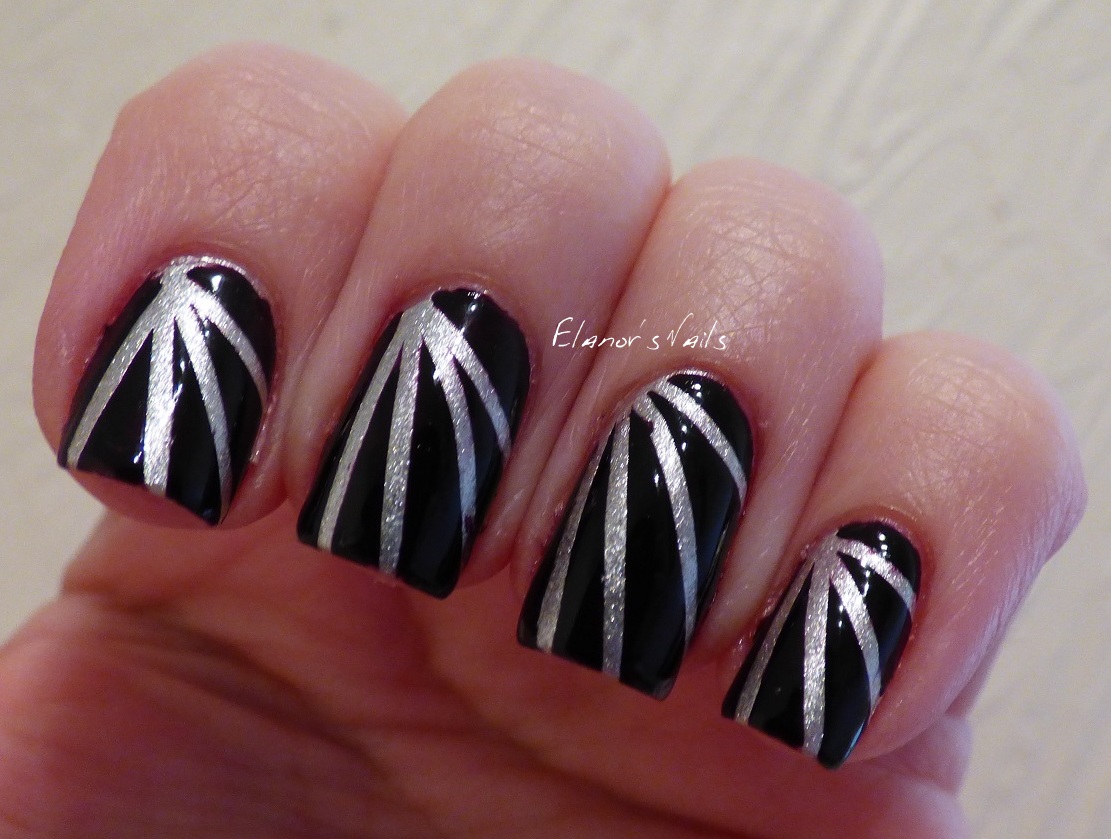
I've heard of the brand but only very vaguely, and never seen it in shops at all. My first try is the silver one.
This is two coats of the silver. I don't think it has a name, although perhaps the number is the identifier.
The formula of this was really nice. This is two coats, but it was almost a one coater. The polish is smooth, easy to apply neatly and dries quickly. I'm not crazy about the brush, as the square lid is quite awkward to hold, but it's not so difficult that it spoils the application.
Of the silver polishes I've tried, this is one of the better ones by a long way. It's not brush strokey, and it didn't chip or peel in the three days I wore this. The shine is really nice, and seems to have a real glow to it.
After two days I used striping tape and Barry M Black Currant to make a rays design.
I like this look too, although Black Currant still just looks black to me - it's very hard to see any purple there!
Barry M have released 6 new Gelly colours for Autumn 2015. They're out now - 4 new dark shades, and 2 glitters exclusive to Superdrug. I have been wanting a black Gelly for ages now, so I was really excited to hear about these. I managed to pick them all up on Friday.
Left to right, here are Black Cherry, Black Currant, Sparkling Ruby, Sparkling Amethyst, Black Grape and Black Pistachio.
First up, the four standard Gelly colours. These are all very dark colours that are almost black - one red, one purple, one blue and one green. The big difference with these is the new brush - it's a wider, flat brush with a curved edge. I know a lot of bloggers are loving the new brush. However, I am not a fan, I'm sorry to say! My nails are quite narrow, so I don't like wide brushes. I find it hard to not get polish on my cuticles, and these ones are particularly awkward to clean up.
First up, here is Black Pistachio. This is a black with a tinge of dark racing green.
As you can see, it's a very very dark green. In many normal lights, at arm's length, this is pretty close to black.
I found this hard to photograph and capture the green-ness of the colour. It does look a bit more green than this, I promise.
My issue is about the clean up! Ewww.
Black Cherry is a dark dark red Gelly, and probably the least black of the 4 colours.
Again, a lovely formula but rather stainy round the edges, and tricky to clean up. If this had the normal Barry M brush, I'd love it.
All these swatches are one coat, with topcoat. The formula is really nice, and dries glossy and opaque. I just find the brush hard work.
Next is Black Currant, the purple one, and perhaps the most black of the 4.
Same good formula, same glossy finish.
I'm wondering how other bloggers have managed to get swatches that clearly look green or red or purple! Mine all look black, with a tiny tiny hint of colour at the edges if you look hard!
Black Currant wasn't as stainy as the others, which surprised me, as it was the most opaque and pigmented.
Last of the 4 main range colours is Black Grape, the blue one.
Again, the same opaque, pigmented formula. And again, I wish the brush wasn't wide and flat.
It's been quite frustrating looking at my swatch photos in thumbnail and trying to work out which is which!
I mean - look!
On the plus side - these do work for stamping! They show their colour a bit more clearly then too, so I'm looking forward to using them in stamping designs.
On to the two limited editions for Superdrug, Sparkling Ruby and Sparkling Amethyst. These aren't strictly speaking glitters, they're more gelly with tiny microsparkle particles.
This is Sparkling Amethyst, the purple one.
This is two thin coats - the second one was only really a touch up - with topcoat for extra shine.
I like the blurriness here, it shows you the sparkle!
Sparkling Ruby is the red one.
Again, the same formula as the others (very nice) and the same brush (not my taste). Two thin coats again, with topcoat.
Amethyst and Ruby aren't as sparkly as I was hoping for, but they are very nice indeed, and I think will get considerable use from me over the autumn and winter. I just wish they had thinner brushes!


_(Front_Cover).jpg)