I wore these bright gradient nails for four whole days this week, because I liked them so much.
I used four of the Models Own Polish for Tans for these - Sarong Wrap, Beach Fire, Barrier Reef and Island Hop.
These blended so easily, they were so easy to make a gradient with. I added topcoat for shine and longevity.
I was planning on stamping some kind of tropical flower design over these, but in the end never did, because I liked them as they were.
I wore these for a couple of days at the end of last week. I used 6 of the Models Own Polish for Tans for this watermarble.
I started with a base of Models Own Coconut Cream, and then used Island Hop, Barrier Reef, Boat Party, Sarong Wrap, Beach Hut and Beach Fire to watermarble over the top.
These polishes spread so easily on the water and are perfect for water marbling. I imagine I'll be doing plenty more of these in future.
I love how these came out!
SOMEHOW, I mysteriously acquired these fabulous Models Own colours today. They just fell into my basket when I wasn't looking.
I mean, oof. Look at them! Some of them are from the new 2016 Polish for Tans range, and a couple (I think the yellow and the bright orange) are from older ones that I didn't have.
Anyway. This is what I did with them. I used the base colour I was already wearing (Barry M Fondant) which had been on for a couple of days) and some What's Up Nails vinyl stencils, and sponged on random blobs of all the new polishes.
I love how this came out! The stencils were a bit fiddly to use, especially on my other hand, but I'm happy with the result, and I'm hoping I can keep these on for a couple of days.
There are one or two splodgy areas where the polish went under the stencil, but I'm choosing to pretend you can't see them.
This is the second of my Illamasqua bargains I found in TK Maxx the other day. This is Superstition, a bright neon pink, which set me back a whole £3!
This is two coats, with topcoat.
The formula is really good, and I liked this a lot. There is some visible nail line at two coats, but I don't mind that. I checked before I took this off, and three coats is fully opaque. You could also paint this over a white base if you wanted an even brighter colour and no nail line.
The polish dries semi matte with a similar rubbery finish to Scorn (one of my favourite blacks) but I added topcoat for a glossy finish. Isn't this gorgeous?
I saw some gorgeous neon nails the other day that were a white background with lots of different neon looks on each nail. I can't find it now though! If anyone knows what it was I saw then please let me know so that I can see how mine compared and credit the inspiration!
Anyway, I started with a white base (Barry M Cotton) and then used dotting tools, striping tape and a fine brush to add various patterns. The colours I used were Models Own Sun Hat, Bikini and Shades, Barry M Superdrug Limited Edition 2013 and Cyan Blue, and Essence Flashy Pumpkin.
I know these aren't perfectly executed, but I am happy with how they turned out. They're bright and colourful (brighter than these photos, which look a bit washed out) and cheered me up during a busy day at work.
And just to prove that I do do both hands every time, here's my right hand!
I know it's less neat, especially with regards to the clean up (and don't look at my scabby cut on my thumb cuticle!) but it isn't significantly different from my other hand, so I'm quite pleased. I was a bit surprised to see a nail blogger on YouTube the other day (NOT the same blogger who did the neon nails I liked) who had gorgeously decorated long nails on one hand, but short, bare nails on the other hand! I understand that sometimes someone will only swatch colours on one hand because it's coming straight off again, but I do nail art because I want to wear it, so I always do both hands!
Have you seen this new brand? It's called Makeup Revolution and alongside their make-up, they have a nail range called Nail Geek.
They recently sent me these five beauties to review! I know they're not very wintery or festive, but I chose the bright ones, because... well... look at them! I love a nice bright polish in the middle of a damp and gloomy November!
The green one is called Refresher, and I think it's my favourite. This is two coats.
The first coat is quite streaky, and the formula is a bit on the tricky side, as it's quite thick. I think that's because of the glitter that's in there - in with the green creme, there is a load of shimmery pink microglitter, which is really interesting. It's not hugely visible, but it adds a nice shimmer and a bit of an edge to the green. It dries well though, and has a lovely glossy finish.
The yellow one, Holiday, is very streaky on first application, like many yellows. It's much better on the second, although still a touch uneven. Then suddenly on the third coat, it becomes really opaque and bright and zingy, and I really liked it!
Next time I might do slightly thicker coats, and see if two coats are enough.
I wouldn't often wear an entirely yellow mani, but I can see this being useful for snooker nails and various summer nail art.
The pink one is called Summer Lovin' and is a lovely bright, cheerful colour. This one had a really good formula, very smooth and even. It's a touch jelly-ish; two coats do leave visible nail line, but are lovely and glossy and bright.
This pink is almost neon, and is really hard to photograph - in real life it is much less coral than this, and more bubblegum pink.
The orange one, Flare, is the least streaky of the set. One coat is almost enough. This is two coats though, just for a perfect finish. The orange is very densely pigmented. It's a bit thicker than the pink and yellow, but less thick than the green.
The blue one is called Into the Night (although actually, my bottle says Inot the Night) and is the most pigmented of all - the colour is very strong and rich. It's less bright than the others, but has a lovely deep colour and a glossy finish.
I like the blue a lot. It's a very Tardis-like shade, which is always good in my book!
I was really impressed with this range. They're not perfect, and the colours aren't amazingly original, but then at £1.99 each, I wouldn't expect that. The quality is nice, the colour range that they have is really good - there are 45 different colours. They're available online here. The brush is decent, and I like the shiny pink print on the bottles. On their website, you can also buy any of their collections of five colours (this is the Paints collection) and get one of the five free. It strikes me that the other collections would make really good ombre manicures too - like those expensive sets you can buy from some companies with five shades of one colour, but at a fraction of the cost and far easier to get hold of!
What do you think? Have you tried these, or would you?
These polishes were provided for my honest review. Please see my Disclaimer for more information.
The second of the Models Own Diamond Luxe collection that I thought I'd try, is Radiant Pink, the bright pink one. Like Pear Purple, this has a thickish but beautifully smooth formula, filled with shimmery diamond dust particles.
Rather than just wear this on the full nail, I used some tip guides to mark off half moons at my cuticles, because it occurred to me that I had still never tried a negative space mani. I then painted two coats of Radiant Pink and removed the tip guides.
Then I used topcoat and added these studs from the Born Pretty Store. I reviewed the studs previously here, where you can find full details of where and how to buy them. I really like these studs! They kind of remind me of eyes... which makes me think that I could do an OWL design with stud eyes! Omg, how awesome would that be?!
Anyway, I really like this polish - the formula is really good, and the colour is a lovely bright zingy pink. And I really like the studs - the coloured ones are really shimmery and rich, and the black ones I used here give a really good contrast with the pink polish.
The studs are really light, and are easily reused - after the last time I used them, they stayed put for a good 24 hours, until I just picked them off and put them back in the pot to use again.
As always, you can use my Born Pretty Store discount code to get 10% off any order.
These studs were provided for review purposes. See my Disclaimer section for more details.
I loved yesterday's neon stripe nails (see post here) and today I wanted to take it up a level with even more stripes! So I got out the striping tape and OPI 4 in the Morning, a lovely matte black with a bit of hidden shimmer, and got busy.
This took surprisingly little time, and I really like the end result!
I'll be honest though - I haven't done this follow-up on my right hand! I'm not going out today, and I want to do something else for work tomorrow, so nobody will know that I didn't bother. Well... apart from you, obviously!
Today I wanted something colourful and bright, and as I'm a huge fan of stripes, I went for that. I started with a base of Models Own Coconut Cream, 2 coats. I am using Coconut Cream all the time recently! It's such a good base for things.
I then used striping tape to make fairly irregular stripes, and painted them using a bunch of bright polishes. I used Models Own Pukka Purple, Bubblegum and Bikini, Barry M Blood Orange and Blue Grape,China Glaze Turned up Turquoise, and a mini OPI orange whose name I can't remember.
I was pretty pleased with how these came out!
I don't know why I don't do stripes on my nails more often.
The stripes might not be perfect, but they are cheerful, and they remind me of my living room rug, which I love. There are lots of stripy things in my house!
Today I realised that I had still never worn the other Models Own Polish for Tans that I bought, Shades. I thought it was about time to remedy that.
This is two coats of Shades, with no topcoat.
I found this really difficult to photograph! It's a neon coral pink, but the photos look more orange than it really is I think. It definitely leans pinker than this.
It's a lovely colour though; I really like it.
And just look at it under UV light! Isn't that something?
Application is really nice, as with the other Polish for Tans range. No issues at all there.
I decided not to leave it at that though, and added one of the new Essence sparkly glitters which I bought last week in Wilko's. This is one coat of Glitz and Glam over Shades.
Glitz and Glam is a clear base with pink and silver glitter and lots of tiny iridescent shimmery particles which have a white-green-pink sheen depending on the light.
I think it's really pretty! I'm not so sure it goes so perfectly with Shades as a base colour, but it's still nice enough I think. I bet it would look amazing over a black or a dark purple though!
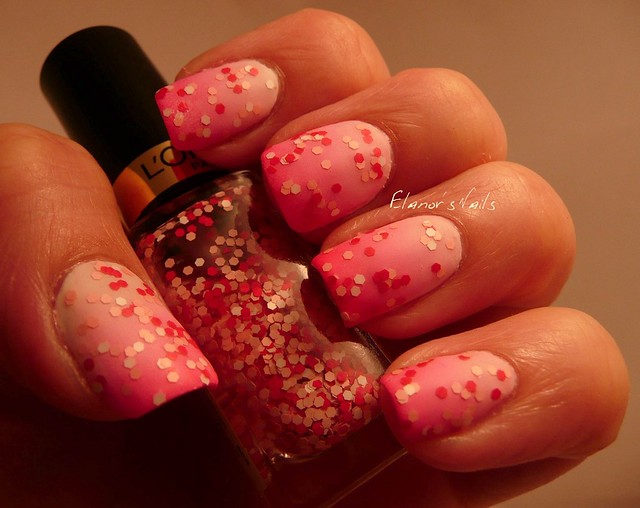
The theme for this month's Polish Party nails is Gradients. I've never been very successful at these (you can see my previous efforts by clicking on my 'gradient' tag) and wasn't really relishing the theme. But then I watched a couple of tutorials online again, and realised I'd been doing them all wrong! So I thought it was worth another go.
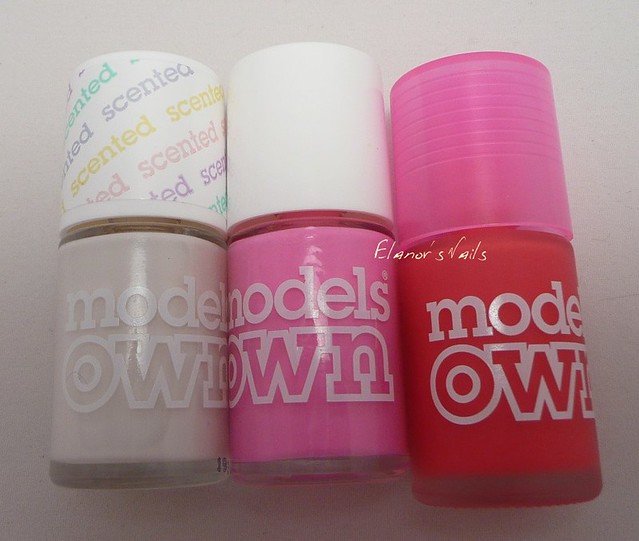
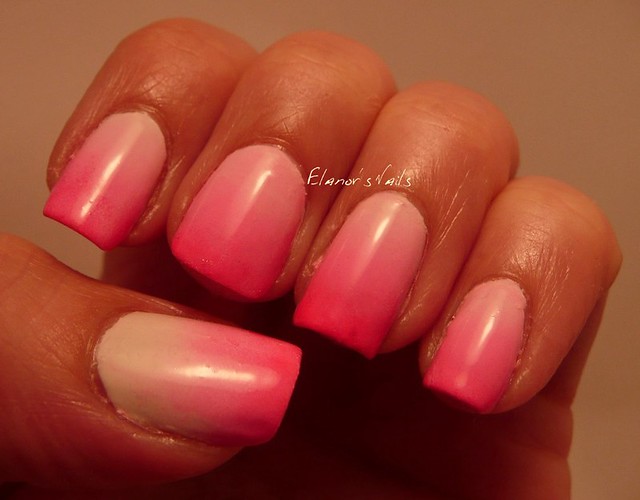
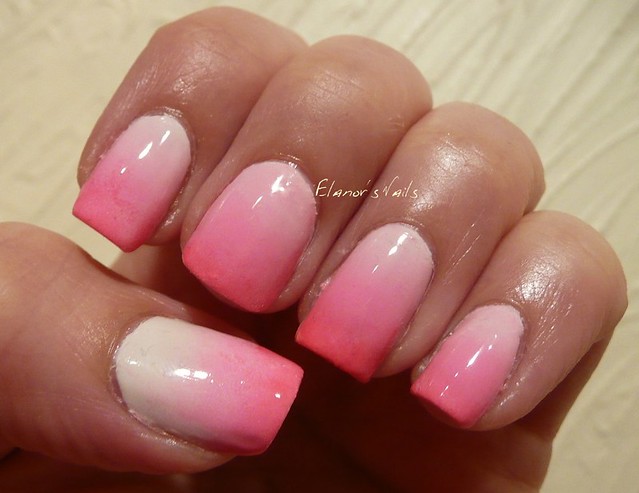
I used these three Models Own polishes - Coconut Cream, Sun Hat and Bubblegum. When I did gradients before, I didn't really sponge on both colours at once - I did one first and then the other. I also used really narrow bits of sponge, thinking it would be neater and give me more control. It turns out that it is a million times better to sponge both colours together (or three, or whatever) and to use a sponge that's wider than the whole nail. I should have known that tutorials by The Nailasaurus should not be ignored! Anyway, this is what I got:
It's so much better than previous gradients I've done!
It's not perfect (there are bits of sponge in there, ha!) but it is a huge improvement and I'm delighted.
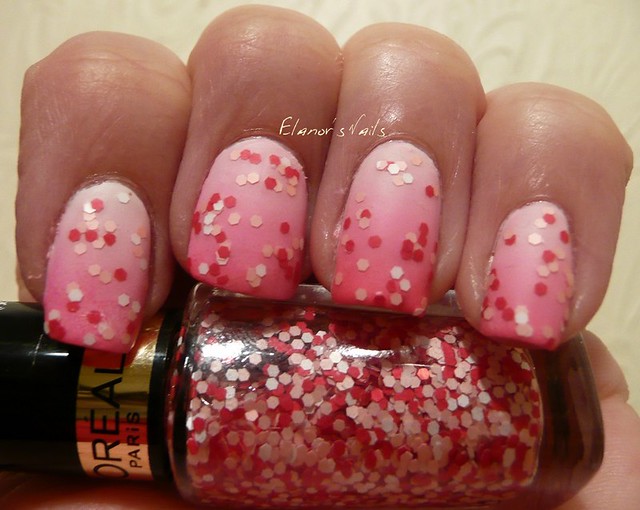
I then decided to jazz it up a bit more with a matte glitter topper I bought a couple of weeks ago - this is L'Oreal Graffiti d'Amour, a mix of white, pink and red glitter, which works perfectly with the polish colours I'd used. Then just for good measure, I added a coat of the new Barry M Matte topcoat as well.
I'm really pleased with how this turned out! Now I know how to do a gradient properly, I'm going to do more!
You can see the rest of the Polish Party's gradient nails here. Please do click and have a look at everyone else's designs! (Come back later as more are added!)