I saw some gorgeous neon nails the other day that were a white background with lots of different neon looks on each nail. I can't find it now though! If anyone knows what it was I saw then please let me know so that I can see how mine compared and credit the inspiration!
Anyway, I started with a white base (Barry M Cotton) and then used dotting tools, striping tape and a fine brush to add various patterns. The colours I used were Models Own Sun Hat, Bikini and Shades, Barry M Superdrug Limited Edition 2013 and Cyan Blue, and Essence Flashy Pumpkin.
I know these aren't perfectly executed, but I am happy with how they turned out. They're bright and colourful (brighter than these photos, which look a bit washed out) and cheered me up during a busy day at work.
And just to prove that I do do both hands every time, here's my right hand!
I know it's less neat, especially with regards to the clean up (and don't look at my scabby cut on my thumb cuticle!) but it isn't significantly different from my other hand, so I'm quite pleased. I was a bit surprised to see a nail blogger on YouTube the other day (NOT the same blogger who did the neon nails I liked) who had gorgeously decorated long nails on one hand, but short, bare nails on the other hand! I understand that sometimes someone will only swatch colours on one hand because it's coming straight off again, but I do nail art because I want to wear it, so I always do both hands!
This week is the Colour Me Crazy PINK week, and well... I have gone a bit crazy this time round!
I couldn't decide whether to do a gradient, or stamping, or stripes, or flowers, or sparklies... so I did ALL THE THINGS! Wooo!
It is possible I went a touch too far!
So, from thumb to little finger, here's what I did.
Thumb: base of Barry M Rose Hip, freehand roses with Barry M Strawberry Ice Cream, Barry M Pink Punch, Models Own Sun Hat and Models Own Coconut Cream.
Index: base of Barry M Pearl, striping tape, sponged gradient of Rose Hip, Strawberry Ice Cream and Models Own Bubblegum, and a neon stud from the Born Pretty Store.
Middle finger: base of Barry M Rose Hip, stamped with Jade Deja Vu and MoYou London Mother Nature plate 11. I was a bit disappointed that the gorgeous holo in Deja Vu doesn't really show here - the polish was too thin to stamp really.
Ring ringer: base of Barry M Blossom, embellishment from Original Sugar (see post with full review here.)
Little finger: base of Barry M Rose Hip, striping tape and Models Own Sun Hat.
Well! I kind of wish I'd also used some glequins too! If you're going to do it, do it ALL THE WAY I say! What do you think?
 Week 3 of the British Nail Bloggers Colour Me Crazy! challenge is YELLOW. I was dreading this one a bit, because, you know... YELLOW! It's not a colour I wear often (or at all) because it's so... yellow. I have precisely two yellow polishes, and I've used them both here.
As it turns out, I don't actually hate this look! I used a base of Models Own Coconut Cream for a nice off-white base. I then added a medley of yellow designs using Barry M Yellow and Models Own Bikini.
On the little finger, I made dots using a fine dotting tool and Bikini. On the ring finger I freehanded some roses with both polishes and a fine nail art brush.
On the middle finger I used striping tape and both polishes to make a striped design. On the index I have a gradient of Coconut Cream and Bikini. On the thumb I was going to add a regular pattern of these yellow glequins, but they were so stuck together that I ended up just slapping on more so they all overlapped. I think in the end it was quite effective!
Today I wanted to do a mish-mash skittle look with red and white polishes. I started with Jacava Toffee Apple, and Essie Blanc on my ring finger. I then added some stamping using MoYou London Pro XL plate 01 and Konad white. I also freehanded some roses on my ring finger using Jacava Toffee Apple and Jacava Crimson Crush, with some Barry M Spring Green. I did the dots on my index finger with a Barry M nail art pen.
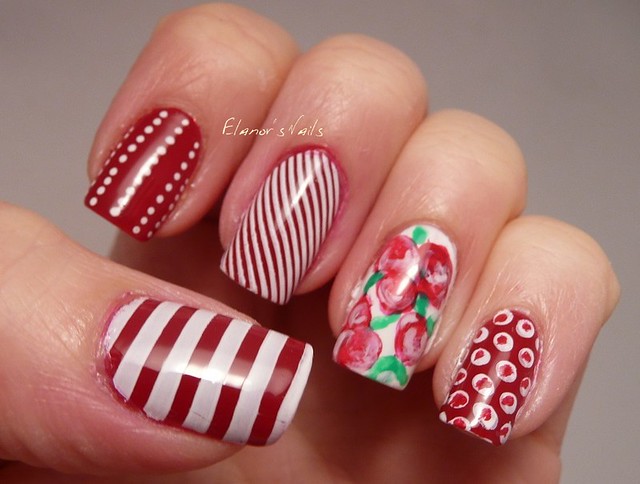
I hate this look! I like most of the nails individually (ish) but not together. I really like the wide stipes on my thumb - that's my favourite part of the stamping plate I think. I like the index finger, but I don't think it goes with the others. I like the middle finger's narrow stripes, but I really don't like how it makes the nail look not-red. It definitely looked more white than red at arm's length. Plus it looks as though the red has stained badly round the cuticle, or that I haven't cleaned up, and I swear that's not true! I think what happened is that when I stamped, the raised cuticle at the edge created a cushion which meant the white stamping didn't reach all the way to the edge. I don't like my roses at all - the colours don't go with the other nails, there are too many of them, and the leaves are messy. And don't even go there with my little finger! Initially these were nice white dots from the stamping plate, but I thought the nail looked too white, so I dotted more red on. Except that I was too lazy to get my dotting tool, and just used the edge of the brush I used for the roses, and it's a hideous mess.
Oh well, you live and learn! This all came off again straight away.
I'm really excited at the moment because I've joined a group of talented ladies called Polish Party! They post at the end of every month, with designs on a theme, chosen each month. See my Polish Party page for details of everyone! This month the theme is black and white. I decided to do a skittle of all different things, as I couldn't decide on one look.
First I painted my nails with base colours. On my thumb is my favourite black, Rimmel Black Out. On my little finger is Zoya Storm, a lovely glittery black. On the other three fingers is Essie Blanc. I then decorated. On my little finger I stuck some small white flower stickers that were part of a birthday present from a friend. On my ring finger I freehanded (using a fine brush and a combination of Zoya Storm, Rimmel Black Out and Essie Blanc) what was meant to be roses. I'm quite disappointed with how they turned out though, as they look more like splodges than roses...
On my middle finger I used striping tape and a coat of Rimmel Black Out to make stripes. Again, I wasn't quite happy with these, as they aren't totally clean. It doesn't show at arm's length, but it looks messy to me in closeup. On my index finger I used a tiny bit of a gingham nail decal from a Born Pretty Store set which I have just received (review and a proper look coming up very soon!) I love this one - gingham is so cute, and I managed to keep this neat.
On my thumb I stamped with Konad White polish using my new Christmas present stamping plate, Mo-You London Rockstar 01. However, I managed to mess this up by not picking up enough of the design, leaving a blank bit at each end of the nail. I then made it worse by trying to fill the gaps, which just made it more obvious!
To finish with, I wondered whether it would look better matte, so I added a coat of Rimmel Pro Matte Topcoat. I quite like this look, but the faults that make me dislike the look initially are still there. Oh well! If you don't look too closely, they're ok!


