Showing posts with label jelly. Show all posts

Wednesday, 4 November 2015

Essie - Meet Me At Sunset

I went to an outlet shopping place at the weekend, acting on a Facebook tip-off! I'm not keen on shopping, and don't really care about clothes. But having heard there was a bargain make-up supply place, I headed off. They had a HUGE wall of polish, from cheapy bargain ones to standard high street, to Essie, OPI, Leighton Denny and loads more. I was quite restrained, and bought 6.


The first one I tried was this Essie, Meet Me at Sunset, which was apparently from their summer 2011 collection. I paid £3 for this. 


This is a lovely bright jelly-like orange. It's also got the old Essie brush, which I much prefer to their current brush as it's narrower and easier for me to use.


The formula was good - a little on the runny side, but nice and smooth. This is three thin coats, although I could have got away with two. I wanted a third for extra opacity. 


The jelly finish convinced me that this would peel straight off - somehow, these sorts of polishes never seem to stay on my nails very well. But I wore this to work for three days and was only just starting to get a little tip wear, so I'd say this was excellent. This also had a beautiful shiny finish, which I loved. 


Friday, 26 June 2015

Opi Color Paints: Glitter Rainbow Curves!

This morning, Emma from Em's Little Corner spotted this gorgeous mani by PiggieLuv and shared it with me because she knew I'd got the OPI Color Paints recently.... and wow! What a fantastic design! I knew I had to have a go at doing my own version.


I did mine a bit differently, as I didn't want to paint white over the top of glitter and end up with it lumpy, and certainly didn't trust myself to do neat lines freehand. Instead, I started with a base of white (Barry M Cotton) and use curved tip guides to tape off the central section of the nails. 


Then I painted a silver glitter over the curved central section. This is 2true Sequins Christy, which is a lovely dense one-coater but with small particles which won't overlap the tape too much.


I topcoated over the silver to make it smoother (Christy has a rough finish to it), and then used the Color Paints to paint my rainbow. I removed the tape, added more topcoat, and there you go.


It's not as fantastic as PiggieLuv's, but I'm pretty damn chuffed with this! The Color Paints look fab over glitter, and I love the contrast of white and the colours. I included this blurry photo because it shows how glossy and juicy these colours are!

What do you think?

Sunday, 21 June 2015

More OPI Color Paints!

Following on from yesterday's big post about the OPI Color Paints (click here if you missed it!) here are two more quick looks I did this morning while I was experimenting with them. 


This is my first attempt at leadlighting. It's not the tidiest, but I do love the effect! I started with a base of Silver Canvas, then stamped using Laqa & Co Black Gloss and MoYou London Holy Shapes XL 04. Then I used a fine paintbrush to add the Color Paints in the spaces. 


This gradient look was done with a white base. I then added a stripe of Color Paints down each side of the nail (yellow and pink, and yellow and turquoise) which I then dragged sideways using the polish brush. Where the yellow and turquoise meet, they make green. Where the yellow and pink meet, they make orange. I love this effect!


Saturday, 20 June 2015

OPI Color Paints!

Ever since I first saw the press release for these, aaaaages ago, I have wanted the OPI Color Paints polishes! They're described as "blendable nail lacquer" colours that can be combined for all sorts of artistic effects. Officially, these aren't on sale in the UK until July 1st, and will only be available in Selfridges. However, they are available on Amazon from lots of different sellers. I bought a set of the minis, as I couldn't decide on what colours I wanted, and didn't want to spend a fortune buying several and then be disappointed. 

This set has Silver Canvas, the 'undercoat' polish, and then 5 of the 8 colours: Primarily Yellow, Chromatic Orange, Pen & Pink, Purple Perspective, and Turquoise Aesthetic. 

How sheer are they?

They're sheer, but very pigmented, so they're nowhere near as sheer as polishes like the Sheer Tints.  Depending on the colour, some are more sheer than others. They are beautiful, glossy and pigmented jellies.


Here are, left to right, Primarily Yellow, Chromatic Orange, Pen & Pink, and Purple Perspective with one coat each.

Here they are with two coats each.The yellow is obviously more sheer than the others. The purple in particular is almost opaque. But I love how juicy and glossy they all are!


Do I need the silver base?
Well, it's going to be up to you. You probably don't need this specific silver base. Do you need a silver base? No, but it does do something different to the polishes. 

Here is Turquoise Aesthetic left to right over the silver base, no base, and a white base.  As you can see, the polish is less streaky over the silver base, and the colour pops much more. On its own, you have the sheer effect and less colour-pop, and over white you get the colour-pop but have some streakiness. Which you prefer is going to be a matter of personal taste.


How does the silver compare to other silvers?

Left to right, I used Models Own Chrome Silver, Barry M Silver Foil, OPI Silver Canvas, and OPI Push and Shove.  These are all one coat, except the Models Own, which is two. 
 

The Models Own Chrome Silver is good for stamping, but I find it hard to use as a polish on its own as it is quite thin, and drags a bit on application, so ends up streaky unless you're really careful. As you can see, it's a bit uneven in application. The Barry M Silver Foil is excellent for stamping, but nothing special to wear on its own.  Silver Canvas is nice and even. OPI Push and Shove is really nice as a shiny chrome, and is definitely shinier than the others here. I found the two OPIs very similar in application, although Push and Shove is more of a mirror-shine. Silver Canvas is really nice to apply, and isn't nearly as brush-strokey as many metallic polishes are. If you already have a silver chrome/metallic that you like, then you probably don't need Silver Canvas too. 


I tried  the Color Paints over all the silvers. As you can see, they're much of a muchness, so if you already have a silver you like, I wouldn't buy another just to use with the Color Paints.


How do they compare to the OPI Sheer Tints?

Very well! I was really excited when the OPI Sheer Tints came out, but they were so disappointing. Formula was gloopy and thick, and the colour was far more sheer than I'd hoped for. The Color Paints are what I hoped the Sheer Tints would be. 


Here I've compared Purple Perspective and Don't Violet Me Down from the Sheer Tints range. Left to right is one coat of Don't Violet Me Down over silver and on its own, then Purple Perspective over silver and on its own. This is typical of the difference - the Sheer Tints are very pale, just a hint of colour, where the Color Paints are very pigmented. The formula of the Sheer Tints is also really difficult to work with as it's so thick and sticky.  The Color Paints have a much better formula - it's much less thick, and not at all gloopy. It seems strange to me that the formula can be so much thicker on the Sheer Tints, and yet the colour less visible, but I suppose that was what they were going for. Anyway, Color Paints beat Sheer Tints hands down for me.  


Do they water marble?

Yes. I struggled to get the mini bottles to drip well, which meant that the colours dried more quickly than I could work with, but the actual spread is really good, and they look really zingy. 


Left is over silver, right is over white. I think my issue was only because the mini bottles are so small that you need to be careful with the brush, so the dripping takes longer and leaves time for the polish to dry on the surface of the water. With full size bottles, I think this would be fine. 


Do they stain?

Generally, no. But you probably need to be very careful with Turquoise Aesthetic!


Can you stamp with them?

No. But you can stamp with black over a base, and then use them for leadlighting. This is my next mani plan for these - I'll add a link here when I've tried this!


What can you do with them?

Lots of things! Here are two designs I did. 

This ruffian design uses the Silver Canvas base. I then painted on Chromatic Orange and Purple Perspective on alternate nails. I also added a stripe of another colour over the original - Primarily Yellow over the orange (which doesn't show) and Pen & Pink over the purple (which does!). 

I wore these for a day, and loved how glowy they were. 


My second design was this freehand flower art, which I did using all the colours and a fine paintbrush. I don't have the green one, so I used yellow and turquoise together. 

I love how this looks! 

It really glows in the evening sunshine!

What's the formula like?
It's good. Even and smooth, and not too thick and gloopy like the Sheer Tints, but not so runny that it floods the cuticles. Application is nice and easy, and drying time is normal.   

Overall, I LOVE this collection. I am definitely going to buy the red one in a full size, although I'm not sure I need the darker blue or the green. I may well also buy some of these mini colours in the full size, although I need to wait til after pay day!


Tuesday, 11 March 2014

Jacava Regent Street

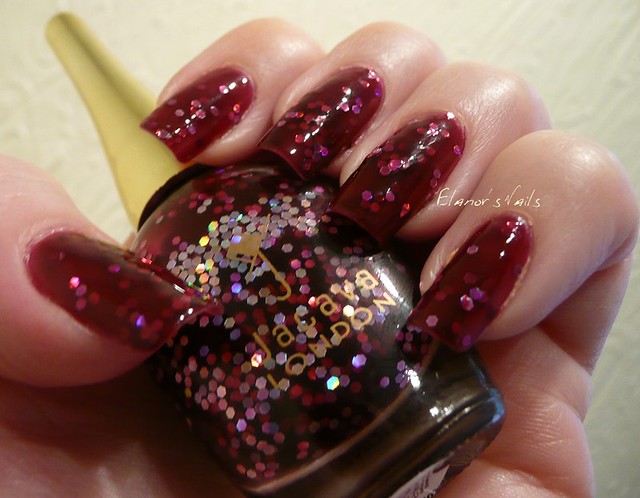
When the new Jacava colours were announced, THIS was the one I most wanted to try. I mean - just look at it in the bottle!


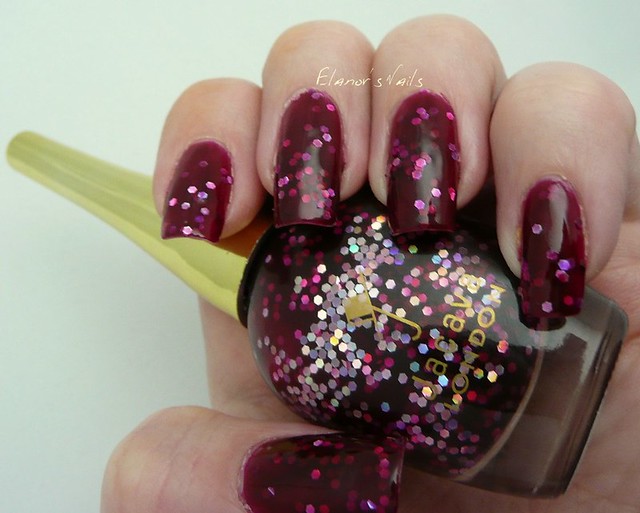
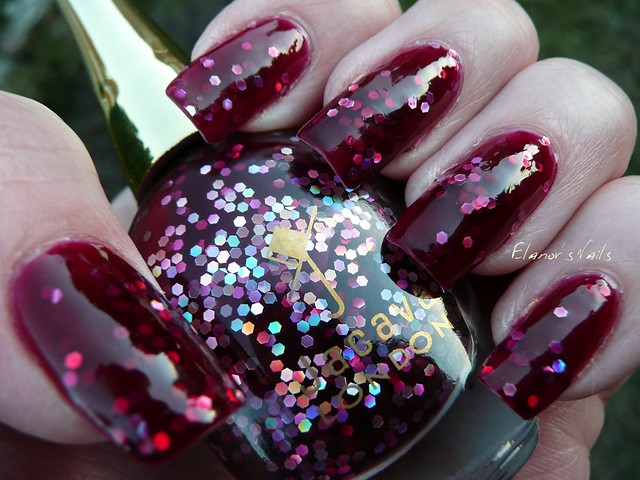
This is Jacava Regent Street, a stunning berry coloured jelly polish with glitter hex pieces.  This is three coats, with topcoat. 


Application for this one is a little trickier than most other Jacava polishes, but only because the glitter can be a bit uneven, so you have to dab it around a bit to spread it out. 


Oh my word though, isn't it stunning?!  I tested this out on a swatch wheel over black and over purple creme, and that's lovely too, but this jelly sandwich effect of the polish on its own was just too gorgeous to not show you Regent Street this way. 


I really like the way this is a sparkly glitter, without being too over the top and blingy. The jelly base is so juicy and vibrant, I think it would look really good as a jelly polish without the glitter in too. 


I snapped this last photo in the evening sunshine as I got home from work, because I noticed that it was looking especially beautiful. I was hurrying, so didn't moisturise my skin, apologies for the dry cuticles. 

Incidentally, I've been using the Jacava topcoat for the last week too, and I really like it a lot. It's a clear topcoat with UV inhibitor, which apparently helps keep white polish white for longer in French manis. I don't usually wear polish for more than a couple of days anyway, so that part doesn't really mean much to me, but it is an excellent topcoat. It's smooth, silky, dries quickly to a super glossy finish, and protects the polish really well. All that makes it as good as my beloved Seche Vite. It also has the lovely Jacava brush of course, and is 8-free (which Seche most definitely isn't - I dread to think what's in that!) so that makes it better than Seche in my opinion!


This polish was provided for review. See my Disclaimer for more details. 


Saturday, 7 December 2013

Deborah Lippmann - Let's Go Crazy

This is the second of my three Deborah Lippmann polishes which I found in TK Maxx for a bargain, and this is the one that made me want to buy the set! This is Let's Go Crazy.
let's go crazy 1
Let's Go Crazy was apparently a limited edition a while ago in certain US stores only. I saw it at the time on blogs, and thought it looked fabulous, but of course, couldn't get it. So I was pretty pleased to see it in TK Maxx!  This is two coats, with topcoat.
let's go crazy 2
Let's Go Crazy is a dark purple jelly base, with multi-coloured glitter in different sizes. It is a bit like Happy Birthday in purple, or Forget You, the Happy Birthday in a black base, but as you can see from the two side by side, they're not really that similar. Forget You (on the left) has much more dense glitter, and more of it is silver, whereas with Let's Go Crazy, the purple jelly base is far more visible, and there is less silver glitter and more purple glitter in the mix.
let's go crazy vs forget you
I love how Let's Go Crazy looks on the nail - the purple is dark, but not so dark that it's black. The jelly shows the glitter without it looking too obvious and blingy, but still lets it sparkle.
let's go crazy 3
This has lasted really well too. I've been wearing this for three days now and it still looks perfect. And with nails as long as mine are now, they're catching in things all the time (zips, keys on my laptop, things in my handbag, all that sort of thing) and yet it's not chipped or peeled or looked at all affected. Which does make me worry that it might take a bit of work to remove...!
let's go crazy 4

Tuesday, 4 December 2012

China Glaze - Creative Fantasy

The latest new collection from China Glaze is the Worlds Away Cirque du Soleil collection. I was surprised to see it in stock at my local tiny shop, as they're usually a bit behind on new collections. Anyway, I bought two, this one and the bright pink, Escaping Reality.
creative fantasy 4
This is Creative Fantasy, three coats with topcoat.
creative fantasy 2
Creative Fantasy is a grape purple jelly. Application is a little tricky, but I think it's worth it! The first coat is pretty hideous - streaky and patchy and ugly. It's also quite a watery formula, so there is higher likelihood of flooding the cuticles. The second coat looks good though, and I think the third coat makes it perfect. This dries to a satiny matte sheen, so these photos are with topcoat. I used Seche Vite, which did give me quite a bit of tip shrinkage, so next time I think I'd use a different topcoat.
creative fantasy 3
I love how this looks! It reminds me of the little pots of grape jelly you get in hotels in the States. I love how juicy it looks, and how the colour deepens with multiple coats.
creative fantasy 1
I also really like how the colour shows a bit paler at the edges. I think this might work for a syrup gradient type mani, which I've seen on other blogs and been tempted by...

Sunday, 18 November 2012

Essie Skirting the Issue + Jordana Copper Blaze

This is yesterday's new purchase, Essie's Skirting the Issue. I was idly browsing in Boots, and picked this up thinking 'meh, another vampy red, I have loads of these...' when I suddenly noticed - JELLY! Oh wow. I have lots of dark, vampy reds. But I do NOT have any vampy red jellies! It looks great on its own, but I thought it might be fun to try a jelly sandwich. 

This is one coat of Skirting the Issue. It's a lovely smooth formula, although a bit streaky at one coat. It dries semi matte in appearance, so this would need topcoat.
skirting the issue 1
I then added a coat of Jordana's Copper Blaze. This was a gift from my lovely American friend Ari, and it's SO sparkly and pretty. It's the perfect glitter for me, in an orangey coppery gold. There's tiny microglitter, and larger hex glitter, all the same colour, in a clear base. I often wear this over black, or dark blue, both of which look good.  Anyway, I then added another coat of Skirting the Issue, which gave me this:
skirting the issue 2
I was initially disappointed, in that it clearly isn't going to make a typical jelly sandwich. The Essie is far too dark for that. You can't see the glitter clearly, much less the colour of it. However, after a few minutes of waving my fingers around, I decided that actually, this looks pretty cool! It was much sparklier and shinier than I'd expected, and I think it looks very similar to Barielle's Elle's Spell (which I posted about here). 
skirting the issue 3
After another coat of Skirting the Issue, I then added a final coat of Copper Blaze. You need to be a little careful when applying this, as the larger pieces can drag, so you do need to push them around a bit to get the placement even.
skirting the issue 5
Copper Blaze is just SO sparkly!
skirting the issue 4

I like this. I think maybe I'll just wear the Copper Blaze over the top of Skirting the Issue in future though, rather than layering it. 

Sunday, 4 November 2012

Nails Inc - Cherry Juicy Sheer, aka Royal Ascot

This is another of the Nails Inc Juicy Sheer collection, the Cherry one. These only appear to be called Juicy Sheers on the Nails Inc website - everywhere on the bottle is only labelled with the names. This one is Royal Ascot.
royal ascot 3
Royal Ascot is a sheer, red jelly. This is two coats, with topcoat. 
royal ascot 1
(indooors, artificial light)
 
Royal Ascot has a really smooth application, which dries to a gorgeous shine. One coat gives a subtle blush-like colour. Two coats is still sheer obviously, with plenty of visible nail line, but the colour deepens to a really nice tomato-ey red. In some lights (indoor, artificial light) this looked a little orangey, and in others (outdoor sunlight) this looked far more cherry-red.

royal ascot 2
(natural light)
 
I bet this would look great as a jelly sandwich with some gold (or maybe black?) glitter. 
  

Thursday, 4 October 2012

Nails Inc Chelsea Flower Show - Orange Juicy Sheer

This is one of the Nails Inc Juicy Sheer collection. On the label this is called Chelsea Flower Show, but it's also called Orange Juicy Sheer on their website. 
chelsea flower show orange juicy sheer 2
This is two coats of Chelsea Flower Show, and no topcoat. Application was really smooth and easy, and though the polish took a bit longer to dry than usual, I really like how this looks.
chelsea flower show orange juicy sheer 1
It's a pretty, shiny, sheer orange. I don't have a problem with visible nail line, although I know some people do. I'm going to try this with glitter in a jelly sandwich at some point soon! I love how juicy and squishy this looks!

Sunday, 16 September 2012

Kleancolor - Born to the Purple

My recent swap parcel included loads of GORGEOUS glitters, and they're all exciting. But the two that grabbed my eye the fastest were two of the Kleancolor jelly glitters, Red Hot and Born to the Purple. Almost immediately, I'd made two rings and a pendant!
born to the purple 2
Here is Born to the Purple on my nails - this is about three coats. It's a little hard to tell, as some of the coats were more dabbings that actual coats. Born to the Purple is a bright fuschia purple jelly polish with stacks of bright purple glitter. The glitter isn't particularly easy to place on the nail, but with some careful dabbing I got an even coverage. 
born to the purple 4
I absolutely LOVE how this looks - it's so squishy and bright and shiny, it reminds me of boiled sweets.  It looked amazing in the sunlight - which of course had gone by the time I got round to taking photos!
born to the purple 5
This took a while to dry. Not an inordinately long time, but longer than many polishes I use. Nothing that was a problem though. And just look at the result!
born to the purple 3
I mean - look how squishy it is!
kleancolor born to the purple ring 2
I love how the ring looks - the glitter is suspended in the jelly and it's just so bright and pretty!

I made a pendant to go with it too.
born to the purple pendant 1
And here is my Red Hot ring.
kleancolor red hot ring 3 kleancolor red hot ring 2
While I'm here, here is a bunch of pendants - some that I've made for a friend, with my Born to the Purple one. What you have here is Models Own Purple Glitter, Sally Hansen Garnet Lapis, China Glaze Emerald Sparkle, and China Glaze Ruby Pumps.

nail varnish pendants 1 nail varnish pendants 2
Related Posts Plugin for WordPress, Blogger...