I was so excited to be asked to review the June Nailbox! I've seen so many of these subscription boxes around for everything from dog toys to makeup to sweets, and only fairly recently heard about Nailbox. I'd heard good things, so I jumped at the chance.
Nailbox is a subscription service where for £13.50 a month, you get a box with
three or four different nail polishes, and one or two nail care or nail art items. These include lots of big brands like OPI, China Glaze, MoYou London, Nails Inc and many others. I was skeptical at first - I have so much nail varnish already, surely I would get a duplicate or colours that are similar to what I already have?
The June 2016 box is themed around Festival Fever, and contains 4 polishes and some nail art tape.
OPI Is Mai Tai Crooked - usually costs at least £9
Bourjois Turquoise Block - usually costs around £5.99
Rimmel Cheeky Chap - usually costs around £2.99
Essie Jazzy Jubilant - usually costs around £7.99
Elegant Touch Metalllic Nail Art Tape - usually costs around £4
So I calculate the value of the box at around £30, which is obviously lots more than the £13.50 the box costs! In fact in some shops, you couldn't buy one bottle of OPI for that amount.
It was also a big plus in that there were no duplicates in my collection, and the OPI and the Essie weren't even similar to any polishes I own. The nail art tape is gorgeous! There are five long strips each of 6 different colours. I use striping tape from time to time, and not as often as I'd like, because I generally find the rolls really fiddly to use. I love the idea of having nice short strips all ready for you to peel off the card! Plus, look at that third one down! It's copper, but it's full of rainbows in the light!

So, what did I do with the contents? I decided to try two different looks. First up is a floral design. I started with a base of the Rimmel, which is a one coater that applies nicely and dries to a matte finish. Then I freehanded some leaves with the Bourjois, and flowers with the OPI. I found that the green didn't really contrast with the blue enough to show clearly in the photos, but it was more obvious in real life. I sponged a bit of the glitter from the Essie into the flower centres and topcoated everything. I wore these nails for two days.
My thoughts about the polishes after making this first design was that the Rimmel was really nice, and I really really like the peachy orange of the OPI. I didn't feel I used enough of the Essie or the Bourjois to really comment.
Next up I wanted to swatch all the colours individually. I made a skittle across all my nails, and then used the tape to make a rays design on two of my nails.
The green swatched beautifully - it applies really well and is another one coater. The OPI is a gorgeous colour, but is a bit thinner and streakier than the other two, and needed two coats. I preferred to topcoat the Rimmel one, as I wasn't crazy about the matte finish.
I did the ray design freehand and then added the tape to cover any wobbles on the joins. I topcoated over everything just in case the tape wasn't sticky enough (I think it was though) and because I want to wear these for a couple of days.
Overall, I'm massively impressed! I'm trying really hard to spend less at the moment, but I am so tempted to sign up. The August box is called "Into the Sunset", which sounds gorgeous. It's my birthday in early September, so maybe I need to treat myself!
You can check out Nailbox on their website here.
This box was provided by Nailbox for my honest review. See my Disclaimer for more details.
I've been a bit lacking in enthusiasm for blogging recently. No real reason, I just haven't felt like it.
Anyway, these are the nails I wore for a few days earlier in the week. Yes, I did both hands.
This is a base of Barry M Pearl, and the stripes were done using China Glaze Glow with the Flow and Jacava Crimson Crush and some striping tape.
I deliberately made the stripes uneven in size and pattern as I knew if I tried to make them the same I wouldn't manage it!
A friend recently gave me a surprise present - look how cute this set is!
I've heard of the brand but only very vaguely, and never seen it in shops at all. My first try is the silver one.
This is two coats of the silver. I don't think it has a name, although perhaps the number is the identifier.
The formula of this was really nice. This is two coats, but it was almost a one coater. The polish is smooth, easy to apply neatly and dries quickly. I'm not crazy about the brush, as the square lid is quite awkward to hold, but it's not so difficult that it spoils the application.
Of the silver polishes I've tried, this is one of the better ones by a long way. It's not brush strokey, and it didn't chip or peel in the three days I wore this. The shine is really nice, and seems to have a real glow to it.
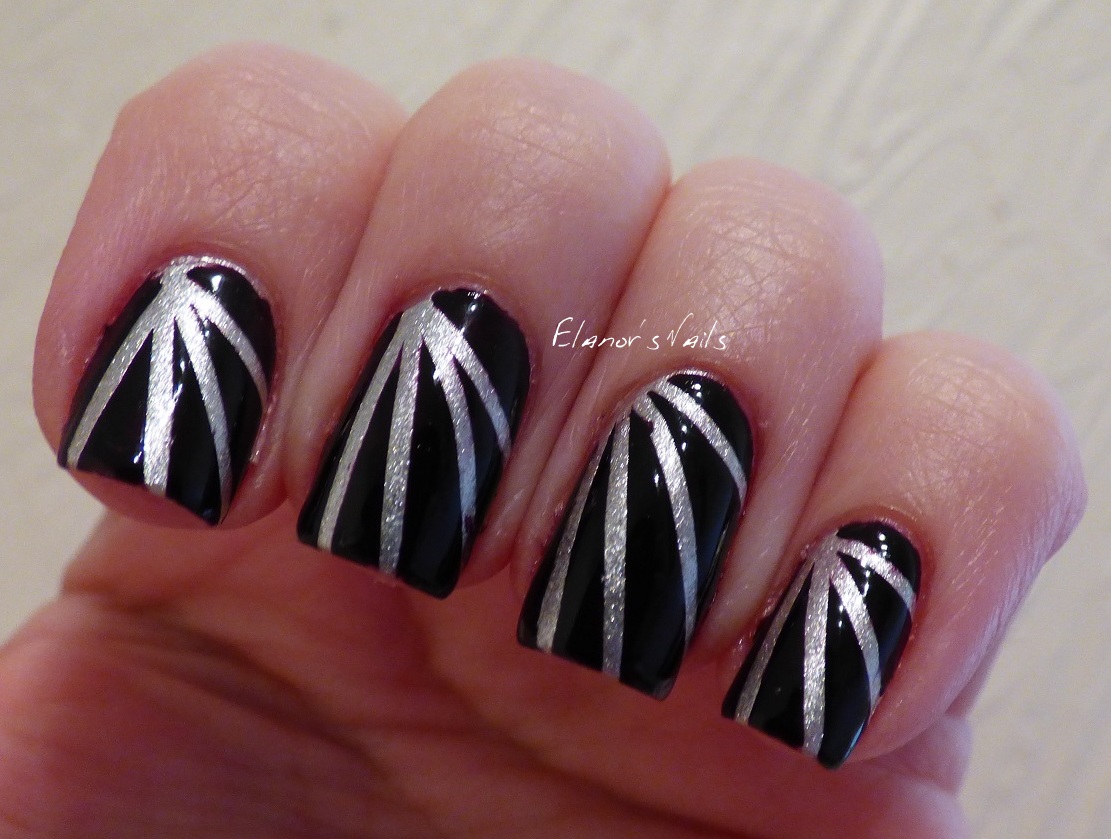
After two days I used striping tape and Barry M Black Currant to make a rays design.
I like this look too, although Black Currant still just looks black to me - it's very hard to see any purple there!
Lauren at The Naily Mail did some gorgeous geometric nails last month, and I've been thinking about the design several times over the last few weeks. Today, when I was a bit stuck for inspiration for what to do, I decided to do my own version of them.
I started with a base of China Glaze Pink-ie Promise (which is lovely, but takes ages to dry well!) and then used striping tape with Zoya Blaze and Barry M Xmas Limited Edition 2012 to make the pattern, and then I added a coat of Seche Vite for extra gloss.
This was easy peasy to do (apart from waiting for Pink-ie Promise to dry) but I'm in love with how it turned out! I love the colours together and I love the effect, and the contrast between the creme, the metallic and the sparkly Zoya.
I really like this design, and I think this will be something I will be doing again with different colour combinations.
Just a quick one today as I've had a massively busy week at work and I'm exhausted! I've also hardly done my nails, although I have worn nail varnish!
My nails are getting really long now! I'm amazed that they haven't broken yet. I've been dashing around at work so much recently that I was sure I'd have ripped a nail off by now! This week I wore Barry M Pink Punch on its own for a couple of days, with Barry M's Christmas limited edition 2012 gold foil as a louboutin on the backs of the nails.
This is the bright pink Gelly, and I love it! After a couple of days I used striping tape to make an accent nail using the same gold.
It's simple, but I think it's quite cute.
Today's nails are a bit of an all-in kitchen sink mani! I started with no overall plan in mind, I just added bits and made it up as I went along!
I started with two coats of Barry M Full Throttle. This is a really pretty peachy orange colour, but it's a streaky, awkward formula, which I always forget. Still, it's a good colour.
I then taped off a couple of nails with a grid of striping tape, and sponged a gradient of Full Throttle and Barry M Satsuma. I decided to add some glitter for good measure, and used China Glaze Electrify, which is packed full of gold and red glitter. I sponged this over the tips, with the odd dab further down the nail.
I loved how the quilted nails looked, but it took a while to do, and was quite fiddly, so I did something different with the other two, and used striping tape, Satsuma and Electrify to add some blocks of colour. The Satsuma looked quite overpowering on its own, so I then added the tiny studs.
I'm so pleased with how these look! And they were a total happy accident, which makes them even better.
I saw some gorgeous neon nails the other day that were a white background with lots of different neon looks on each nail. I can't find it now though! If anyone knows what it was I saw then please let me know so that I can see how mine compared and credit the inspiration!
Anyway, I started with a white base (Barry M Cotton) and then used dotting tools, striping tape and a fine brush to add various patterns. The colours I used were Models Own Sun Hat, Bikini and Shades, Barry M Superdrug Limited Edition 2013 and Cyan Blue, and Essence Flashy Pumpkin.
I know these aren't perfectly executed, but I am happy with how they turned out. They're bright and colourful (brighter than these photos, which look a bit washed out) and cheered me up during a busy day at work.
And just to prove that I do do both hands every time, here's my right hand!
I know it's less neat, especially with regards to the clean up (and don't look at my scabby cut on my thumb cuticle!) but it isn't significantly different from my other hand, so I'm quite pleased. I was a bit surprised to see a nail blogger on YouTube the other day (NOT the same blogger who did the neon nails I liked) who had gorgeously decorated long nails on one hand, but short, bare nails on the other hand! I understand that sometimes someone will only swatch colours on one hand because it's coming straight off again, but I do nail art because I want to wear it, so I always do both hands!
This was my first nail design of the new year. I've worn this for the last couple of days - which slightly brightened up my return to work.
I did this with striping tape over bare nails, then painting Barry M Dragon over the side sections, and Binky London Gold Rush along the middle section.
It's simple and basic, but I really like it!
I'm almost late again! This time of year is ridiculously busy for me, and I haven't had time this last week to blog (although my nails weren't bare the whole time), so I'm catching up over the weekend! This week the British Nail Bloggers are doing Black and White.
I started with a base of Essie Blanc, and then used striping tape and OPI 4 in the Morning to make this geometric design.
I also added a couple of black rhinestones and topcoat for a bit more shine.
I was pretty pleased with these - apart from one or two tiny splodges, the lines are really neat and even.
Inspired by something The Naily Mail said on Twitter, I then added a contrasting coat of red underneath the nails using Orly Ma Cherie (because it's a mini and the brush is nice and easy to get underneath my nails neatly).
I do this contrasting flip colour underneath my nails from time to time, usually when my nails are really long like this. They're too long really - they're starting to make it awkward to do some things. I'll have to shorten them soon, but I really hate filing or cutting, it sets my teeth on edge a bit, so I'll avoid it for a few more days (probably until one breaks!)
What do you think? I'm pleased with these, and I wish I'd left them on for work tomorrow. I'm not quite sure why I didn't!
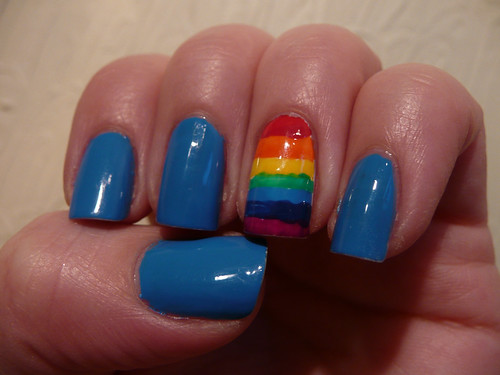
This week, one of my colleagues went to get her nails done at a salon, and asked for a rainbow accent nail. Apparently, they told her it couldn't be done! (They did a lovely skittle mani for her instead, but it was no rainbow!) So I decided to do a rainbow accent nail myself.
The main colour is Barry M Mist, one of the lovely Silk range. I then used a lot of different colours and lots of striping tape to make the accent nail.
Left to right in the photo above (I think!) are: Models Own Pukka Purple, Rimmel Ultra Violet, Barry M Pink Punch, Barry M Blood Orange, OPI Roll in the Hague, Barry M Yellow, MoYou London Spring Green, Barry M Huckleberry, Barry M Guava, Barry M Blue Grape, and Models Own Pukka Purple again.
I'm really chuffed with how neatly this came out! It's a million times better than the first time I tried to make rainbow stripes!
What do you reckon? An improvement?
This week is the Colour Me Crazy PINK week, and well... I have gone a bit crazy this time round!
I couldn't decide whether to do a gradient, or stamping, or stripes, or flowers, or sparklies... so I did ALL THE THINGS! Wooo!
It is possible I went a touch too far!
So, from thumb to little finger, here's what I did.
Thumb: base of Barry M Rose Hip, freehand roses with Barry M Strawberry Ice Cream, Barry M Pink Punch, Models Own Sun Hat and Models Own Coconut Cream.
Index: base of Barry M Pearl, striping tape, sponged gradient of Rose Hip, Strawberry Ice Cream and Models Own Bubblegum, and a neon stud from the Born Pretty Store.
Middle finger: base of Barry M Rose Hip, stamped with Jade Deja Vu and MoYou London Mother Nature plate 11. I was a bit disappointed that the gorgeous holo in Deja Vu doesn't really show here - the polish was too thin to stamp really.
Ring ringer: base of Barry M Blossom, embellishment from Original Sugar (see post with full review here.)
Little finger: base of Barry M Rose Hip, striping tape and Models Own Sun Hat.
Well! I kind of wish I'd also used some glequins too! If you're going to do it, do it ALL THE WAY I say! What do you think?
I loved yesterday's neon stripe nails (see post here) and today I wanted to take it up a level with even more stripes! So I got out the striping tape and OPI 4 in the Morning, a lovely matte black with a bit of hidden shimmer, and got busy.
This took surprisingly little time, and I really like the end result!
I'll be honest though - I haven't done this follow-up on my right hand! I'm not going out today, and I want to do something else for work tomorrow, so nobody will know that I didn't bother. Well... apart from you, obviously!
Today I wanted something colourful and bright, and as I'm a huge fan of stripes, I went for that. I started with a base of Models Own Coconut Cream, 2 coats. I am using Coconut Cream all the time recently! It's such a good base for things.
I then used striping tape to make fairly irregular stripes, and painted them using a bunch of bright polishes. I used Models Own Pukka Purple, Bubblegum and Bikini, Barry M Blood Orange and Blue Grape,China Glaze Turned up Turquoise, and a mini OPI orange whose name I can't remember.
I was pretty pleased with how these came out!
I don't know why I don't do stripes on my nails more often.
The stripes might not be perfect, but they are cheerful, and they remind me of my living room rug, which I love. There are lots of stripy things in my house!