Today I wanted something vaguely spring-like. I ended up going with these blue and yellow floral stamped nails.
The base is two coats of Jacava Justice Walk, a pretty slatey grey-blue with a great formula.
I then stamped using MoYou London Bahamas Punch, and a Bundle Monster plate, the Lucy's Stash blogger plate BM-XL209.
I added topcoat for extra shine. I really like how these turned out!
Tonight is the start of the baseball World Series, and the Cubs are there for the first time since 1945, and haven't won it since 1908. I'm not a huge follower of baseball these days, but I do really like it. I was forced to a game in New York in 2001, and absolutely LOVED it, and then got addicted to the old Channel 5 MLB shows back in the day. I went to a Cubs game at Wrigley Field in 2007, and loved it even more.
So today I've got Cubs nails. They're not perfect - they look much neater with my eyes than they do in photos! I wish the lines were cleaner.
I started with a base of Barry M Cotton and then used some stencils (which I won from Claire at Kerruticles in a giveaway) and Barry M Blood Orange to make the baseball nail. The pinstripe nails and the W (the Cubs 'fly the W' over Wrigley Field when they win) used tape and Barry M Blue Grape. The Cubs logo was rather wonkily freehanded using both colours and a thin brush.
I did do both hands, but just did the pinstripes and baseballs on my right.
I probably won't be watching the World Series this year, because it's not on telly here, and I can't be staying up til stupid o'clock to stream things. If it's on at the weekend and I'm not dead to the world, then I might... I would love to see the Cubs winning!
Sorry for the lack of posts - I've been on holiday! I thought I'd set these blue nails to post while I was off, but apparently not, so here they are now.
This is another of my Bow Thermo Topcoats (I bought 5 of them). I started with two coats of this. It dries to a pretty matte finish, with a subtle sparkle.
This polish goes from a translucent blueish white when warm to a deep blue when cold.
I then stamped over this using Barry M Blue Grape, and a MoYou London plate, although I can't remember which one. I also added Seche Vite for extra shine and smoothness.
I do love stamping over a thermal polish, for the way you get a pattern appearing as if by magic!
My nails look so long here! I broke a couple before I went away on holiday, so cut them down quite a bit before I went.
I've done freehand rose nails before more than once, but it's something I end up doing fairly regularly, because I like them so much.
The base for these nails is Barry M Rose Hip and Huckleberry. I then used Models Own Coconut Cream, Island Hop and Barrier Reef to paint the roses, and MoYou London Spring Green and Key Lime for the leaves. I then topcoated over everything for a smooth finish.
I'm pretty pleased with the right hand too - although don't look at my messy cleanup and dry cuticles! Somehow I can paint my nails on the right hand, but not do the cleanup!
I'd love to know your thoughts! Comments are lovely (even if you have criticism!)
I was so excited to be asked to review the June Nailbox! I've seen so many of these subscription boxes around for everything from dog toys to makeup to sweets, and only fairly recently heard about Nailbox. I'd heard good things, so I jumped at the chance.
Nailbox is a subscription service where for £13.50 a month, you get a box with
three or four different nail polishes, and one or two nail care or nail art items. These include lots of big brands like OPI, China Glaze, MoYou London, Nails Inc and many others. I was skeptical at first - I have so much nail varnish already, surely I would get a duplicate or colours that are similar to what I already have?
The June 2016 box is themed around Festival Fever, and contains 4 polishes and some nail art tape.
OPI Is Mai Tai Crooked - usually costs at least £9
Bourjois Turquoise Block - usually costs around £5.99
Rimmel Cheeky Chap - usually costs around £2.99
Essie Jazzy Jubilant - usually costs around £7.99
Elegant Touch Metalllic Nail Art Tape - usually costs around £4
So I calculate the value of the box at around £30, which is obviously lots more than the £13.50 the box costs! In fact in some shops, you couldn't buy one bottle of OPI for that amount.
It was also a big plus in that there were no duplicates in my collection, and the OPI and the Essie weren't even similar to any polishes I own. The nail art tape is gorgeous! There are five long strips each of 6 different colours. I use striping tape from time to time, and not as often as I'd like, because I generally find the rolls really fiddly to use. I love the idea of having nice short strips all ready for you to peel off the card! Plus, look at that third one down! It's copper, but it's full of rainbows in the light!

So, what did I do with the contents? I decided to try two different looks. First up is a floral design. I started with a base of the Rimmel, which is a one coater that applies nicely and dries to a matte finish. Then I freehanded some leaves with the Bourjois, and flowers with the OPI. I found that the green didn't really contrast with the blue enough to show clearly in the photos, but it was more obvious in real life. I sponged a bit of the glitter from the Essie into the flower centres and topcoated everything. I wore these nails for two days.
My thoughts about the polishes after making this first design was that the Rimmel was really nice, and I really really like the peachy orange of the OPI. I didn't feel I used enough of the Essie or the Bourjois to really comment.
Next up I wanted to swatch all the colours individually. I made a skittle across all my nails, and then used the tape to make a rays design on two of my nails.
The green swatched beautifully - it applies really well and is another one coater. The OPI is a gorgeous colour, but is a bit thinner and streakier than the other two, and needed two coats. I preferred to topcoat the Rimmel one, as I wasn't crazy about the matte finish.
I did the ray design freehand and then added the tape to cover any wobbles on the joins. I topcoated over everything just in case the tape wasn't sticky enough (I think it was though) and because I want to wear these for a couple of days.
Overall, I'm massively impressed! I'm trying really hard to spend less at the moment, but I am so tempted to sign up. The August box is called "Into the Sunset", which sounds gorgeous. It's my birthday in early September, so maybe I need to treat myself!
You can check out Nailbox on their website here.
This box was provided by Nailbox for my honest review. See my Disclaimer for more details.
I haven't posted for a couple of weeks - sorry! I don't even have any reasons. I've been doing my nails, just not posting.
Anyway, here is what I have on right now, some mermaid fish-scale nails using more of my stencils from Whats Up Nails.
I started with a base of Barry M Pacific, which is a greeny blue metallic polish. This was two coats.
I then used the vinyls and splodged on a random pattern using 3 textured glitters: 2true Christy (silver) and Barry M VIP (blues) and Fashion Icon (purples). The final design was very very textured, so I added one coat of Seche for a little bit of smoothness and shine.
I really like how these came out, and they are really sparkly in the sunlight.
I think next time I would use a more contrasting base colour though, so the fish scale pattern shows a bit more clearly. Having said that, the vinyl stencils themselves are really good. I bought loads of designs, so I have lots more coming up!
I've posted before about how much I love the Crucible Theatre (see here for my previous nails) and I was there on Thursday night for Artistic Director Daniel Evans' leaving do, so I decided it was the perfect time to redo my Crucible nails.
I love the Crucible so much! It's my far my favourite theatre ever, and I go often (although not often enough for my liking!)
These are just a straightforward chevron skittle. I used nail vinyls from What's Up Nails to make these. The base colours are Barry M Blue Grape, Essence Flashy Pumpkin, Barry M Blood Orange, Illamasqua Prosperity and Barry M Key Lime. The black top colour is OPI 4 In the Morning.
I'm happy with how these came out. They're much tidier than my previous effort, and the colours are clearer.
Sorry for the lack of blog posts recently - I've been off and about jumping up and down at Springsteen concerts. It's been far too long since I got the chance!
This tour is based around the 35th anniversary River boxset that Bruce released last year, and the album sleeve of the original River album is what I used as (very loose) inspiration for my nails.
I decided to use the colour scheme, and my favourite MoYou London stamping plate (Rockstar 01). I started with a base of OPI 4 In the Morning, and then stamped using the guitar designs and Konad White. I then painted over the white with OPI Turquoise Aesthetic, from the Color Paints collection, to get the teal-blue colour. I then freehanded the plaid thumbnail using a base of Barry M Coconut and Chai, and OPI 4 In the Morning.
The plaid came out a bit rough round the edges, but somehow that seems appropriate for Bruce...
I wouldn't normally take blog photos in the evening sunlight like this, but again, it seemed appropriate for Bruce. There's something about that evening light around sunset that just goes perfectly with a Bruce show...
You can see my previous Springsteen nails here.
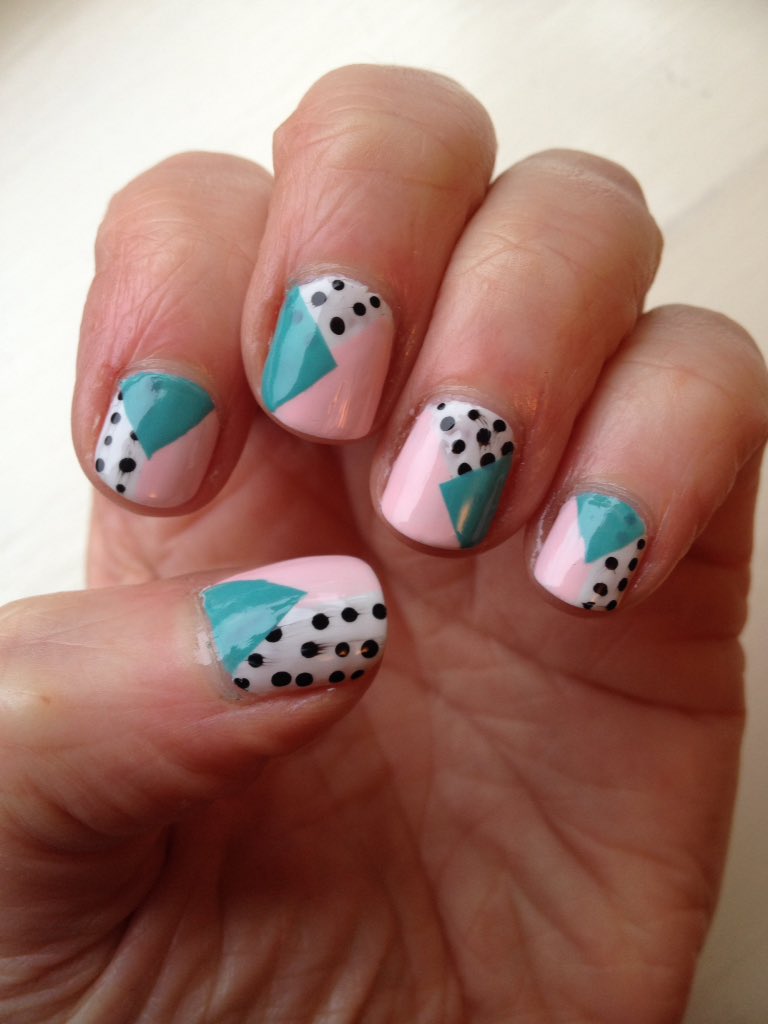
My friend Wendy and I have both been lacking inspiration a bit recently, and on Friday we challenged each other to do 80s nails. Here are mine!
My nails are inspired by an awesome top I had around 1985ish. It was a batwing, slash neck, off the shoulder, cropped delight, with a graffiti style turquoise grid pattern, and some big orange roses. I have managed to recreate the pattern, if not the batwing amazingness.
The base is Barry M Cotton. I then stamped using Barry M Guava and Born Pretty stamping plate BP-40. I then freehanded the roses using lots of different oranges, and a yellow, and two greens.
I'm really pleased with how these turned out. They're a bit garish, but they're certainly how I remember the 80s. After I'd been wearing these for a few hours, it struck me what the background reminded me of - J cloths!
I wore these Out last night (yes, I did both hands) and just as I got home, one nail on my left hand broke right off! Luckily it didn't break down past the nail line, but I've had to file all my nails down pretty short to match.
Here are Wendy's! Aren't they ace? They're SO 80s.
Check her out on Instagram!
I've been feeling pretty disillusioned with blogging recently, but I have still been doing my nails (and apparently buying FAR too many Mo You London stamping plates!) So today, just a quick look at a couple of the designs I've been wearing.
These nails were more reverse stamping decals. I started with a base of Barry M Pearl, and used MoYou London Flower Power 04 to stamp using Konad Black, Barry M Dragon and Colors by Llarowe This Heart Bleeds.
I really like how these came out! There are a couple of smudgy bits in places, but I'm choosing to ignore them.
These blue nails are the ones I am wearing now - I've had these on for three days now.
I started by sponging on a splodgy, random base using lots of Barry M Gelly blues.
I then stamped using MoYou London Flower Power 08 and Konad White. I managed to get the design pointing in different directions on each nail, but oh well.
The MoYou London Flower Power plates are gorgeous! I had to buy six.
These nails were inspired by these gorgeous dotted Easter eggs by Lucy's Stash - aren't they beautiful? My nails are a very pale second in comparison!
I started with a base of Barry M Cream Soda. I then painted the half moons using a fine paintbrush, and used a dotting tool to make the patterns.
I used a whole batch of Barry M Gelly colours to do these: Sugar Apple, Acai Smoothie, Dragon, Sugar Plum, Pink Punch, Guava and Blue Grape.
Today's nails are some freehand floral nails. I haven't done flowers in far too long!
I started with a base of Barry M Sugar Apple, a pretty blue-green creme. I then used a fine brush to freehand the flowers. I used a combination of Konad White, then Barry M Pink Punch and Rose Hip for the petals, with Yellow for the centre, and Key Lime and MoYou London Spring Green for the leaves.
I'm really pleased with how these turned out!
And just to show that I do always do my right hand, even if it's not quite as neat, here's my other hand! Sorry, I can't pose it properly or hold the camera level!
I kind of wish I'd added lots more flowers now!
The new Barry M autumn-winter Gellys seem to be a big hit amongst bloggers currently. You can see my swatches here.
They work really well for stamping! I used 8 different Barry M Gelly colours for this skittle - a corresponding paler one for each of the 4 almost-black colours. I stamped using MoYou London Steampunk XL plate 7.
The red is the only one which doesn't work as well over the bright colour. The contrast isn't quite as strong as the other ones I chose.
These are Blood Orange, stamped with Black Cherry, Key Lime stamped with Black Pistachio, Fondant stamped with Black Currant and Guava stamped with Black Grape.
These work really well for stamping, and I can see them getting a lot of use from me this winter.
I'm excited about today's post! I have a third lovely Jacava polish to show you, plus some nail art I've done using the new polishes, plus details of an exciting Jacava giveaway which will allow one lucky person to win the entire Woodlanders polish collection!
Photo credit: Jacava.com
These were the three polishes I tried:
You can see my swatches of Holbein Place and Justice Walk by clicking on the links. Today I have Phene Street to show you.
This is the darkest of the three, and is a gorgeous muted, dusky purple. I really love the tone of all three of these polishes (and of lots more in the collection) which really does fit in with the misty autumnal woodland idea of the collection.
Phene Street is another polish with a fantastic formula and finish. This is two coats, although this was opaque with one. I only added a second out of habit!
I really like how these colours go together, so I also used them for a couple of nail art looks. First off, I used sellotape to make a simple blocked tape design.
I was really pleased with this, and wore this for a day at the weekend.
The colours go so well together, I think!
Then today, I've used the colours to make a gradient and a water marble.
These worked really well for water marbling, I was very impressed! And they're fabulous for gradients - I love how nicely they blended.
Last up, the exciting news! Jacava are running a competition which will allow someone to win the entire collection! (See the range here - that's SEVENTEEN bottles of polish!) All you have to do is check out their Twitter or Facebook, and follow the instructions to enter.
These polishes were provided for my honest review. I don't get anything if you enter or win the competition (I'm entering it too!) See my Disclaimer section for more information.


_(Front_Cover).jpg)