Yesterday I did a pretty purple gradient using three Barry M polishes - Fondant, Sugar Plum and Blackberry.
I really liked this, and wore it alone for the day.
Today I wanted to do something else to it, and decided to do a freehand floral design over it. I used some thin brushes and Konad White to make some grassy leafy stems, which I thought looked quite pretty.
However, because I never know when to leave well enough alone, I started adding Barry M Lilac Foil - which wasn't too bad when it was just the stems, but then I added stupid flowery blobs on top of the stems too, which was a mistake. I don't like how this all looks, so I've taken these off now. Boo.
Showing posts with label FAIL. Show all posts
Sunday, 29 January 2017
Thursday, 5 February 2015
Invisible Stamping Fail!
Oh dear. This seemed like such a good idea at the time, and it did look pretty in giant close up under a bright light. But as soon as I stepped away from my nail painting table with its bright light, and took off my glasses, my stamping became entirely invisible!
I started with two coats of Rimmel Pro Ultra Violet, a fab lilac polish which I really like.
I then stamped using Barry M Lilac Foil, and MoYou London Pro XL 14 plate.
It's pretty isn't it? But I really wish I'd stamped using white, or gold, or dark purple. Or SOMETHING other than this!
I started with two coats of Rimmel Pro Ultra Violet, a fab lilac polish which I really like.
I then stamped using Barry M Lilac Foil, and MoYou London Pro XL 14 plate.
It's pretty isn't it? But I really wish I'd stamped using white, or gold, or dark purple. Or SOMETHING other than this!
Sunday, 18 January 2015
Very Imperfect Stamping
I couldn't decide what colour to do my nails, so I left the choice up to my friend Kate. She picked yellow and black (aargh!) and this is what I came out with.
The yellow is Barry M Mustard Gelly. This is two coats. I really like Mustard - as yellows go, it's quite a flattering shade, and the formula is really good. I then stamped over it using Konad Black and MoYou London Pro XL 01.
Now, I think I'm about ready to give up on Konad Black! I have never once had a successful stamping experience with it - there is always at least one nail where the stamp either doesn't transfer properly (middle finger) or where it smears with topcoat (several nails today) or where it goes all weird and peels off before I can add topcoat (middle and thumb especially here). This doesn't happen when I stamp with anything else! So that's it, no more stupid Konad Black! I'm buying something better.
I'm not particularly happy with this at all. However, I'm leaving them on, as I want to go to bed, and the right hand is much better, and they don't look too bad at arm's length.
The yellow is Barry M Mustard Gelly. This is two coats. I really like Mustard - as yellows go, it's quite a flattering shade, and the formula is really good. I then stamped over it using Konad Black and MoYou London Pro XL 01.
Now, I think I'm about ready to give up on Konad Black! I have never once had a successful stamping experience with it - there is always at least one nail where the stamp either doesn't transfer properly (middle finger) or where it smears with topcoat (several nails today) or where it goes all weird and peels off before I can add topcoat (middle and thumb especially here). This doesn't happen when I stamp with anything else! So that's it, no more stupid Konad Black! I'm buying something better.
I'm not particularly happy with this at all. However, I'm leaving them on, as I want to go to bed, and the right hand is much better, and they don't look too bad at arm's length.
Saturday, 29 March 2014
China Glaze Glimmer More
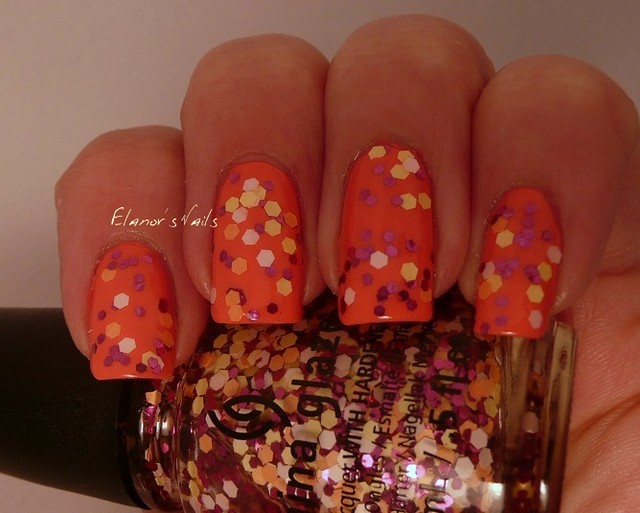
I was in my favourite nail varnish shop the other day, having heard that they'd got the Opi Sheer Tints in, and while I was there, spotted the new China Glaze Surprise collection and couldn't resist this one, Glimmer More. When I first saw swatches of this collection online, I have to say I didn't really like the look of it - I'm not a fan of 'untidy' looking glitter somehow. But this just looked so pretty in the bottle that I couldn't resist!
I thought I would try this out over the Models Own Hypergel, Coral Glaze. You may remember my previous post about the Hypergels, and the difficulties I had with them not drying. I did actually write to Models Own, who replied to say that they'd not heard of this issue before, but that they would investigate, and that I should make sure my nails were clean and dry before applying nail varnish. They did send me three replacement polishes though (I chose Bubblegum Ice Neon, and a couple of jelly glitters - posts to come later) which was nice. But I was determined to try the Hypergels again one last time, just in case.
This time I used a different base coat to my usual one, in case the Hypergel didn't like my base. I made sure my nails were scrupulously clean. I waited an hour between the first coat and the second. Then I waited another hour before adding Glimmer More as a glitter topcoat. This is a very pretty glitter - there's sparkly magenta hex glitter, and larger matte white, pale orange and yellow hex pieces. I like the contrast between the sparkly and the matte glitter, I think it's really pretty. This is awkward to apply though, because of the skinny brush; you do have to dab this around quite a lot.
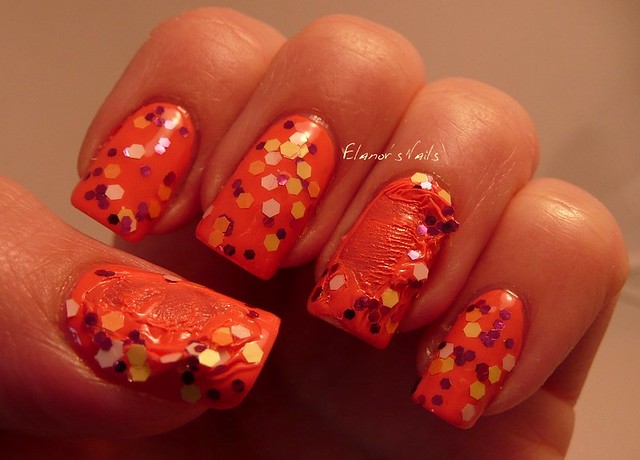
I like the way this looks, although I don't love it. I think Glimmer More would look better over a pretty pastel pink though. And then, I thought that as it had been several (at least three!) hours since I applied the first coat of Coral Glaze, I'd see how well it had dried...
Yep. It just wiped off. So I officially give up on the Hypergels! They just Do Not Work for me.
I thought I would try this out over the Models Own Hypergel, Coral Glaze. You may remember my previous post about the Hypergels, and the difficulties I had with them not drying. I did actually write to Models Own, who replied to say that they'd not heard of this issue before, but that they would investigate, and that I should make sure my nails were clean and dry before applying nail varnish. They did send me three replacement polishes though (I chose Bubblegum Ice Neon, and a couple of jelly glitters - posts to come later) which was nice. But I was determined to try the Hypergels again one last time, just in case.
This time I used a different base coat to my usual one, in case the Hypergel didn't like my base. I made sure my nails were scrupulously clean. I waited an hour between the first coat and the second. Then I waited another hour before adding Glimmer More as a glitter topcoat. This is a very pretty glitter - there's sparkly magenta hex glitter, and larger matte white, pale orange and yellow hex pieces. I like the contrast between the sparkly and the matte glitter, I think it's really pretty. This is awkward to apply though, because of the skinny brush; you do have to dab this around quite a lot.
I like the way this looks, although I don't love it. I think Glimmer More would look better over a pretty pastel pink though. And then, I thought that as it had been several (at least three!) hours since I applied the first coat of Coral Glaze, I'd see how well it had dried...
Yep. It just wiped off. So I officially give up on the Hypergels! They just Do Not Work for me.
Sunday, 23 March 2014
Red and White Mish Mash - a Bit of a Fail
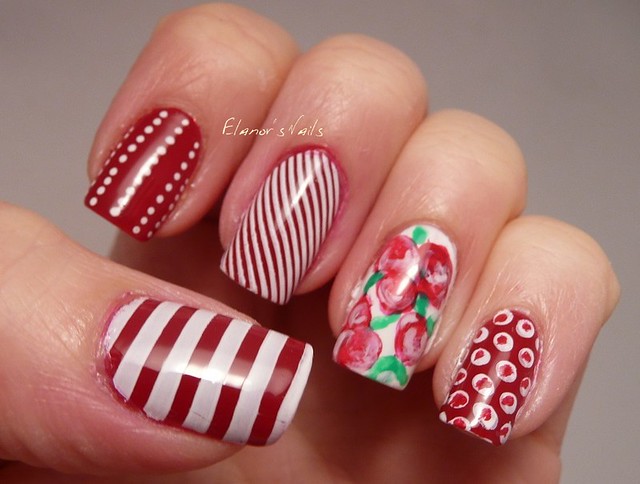
Today I wanted to do a mish-mash skittle look with red and white polishes. I started with Jacava Toffee Apple, and Essie Blanc on my ring finger. I then added some stamping using MoYou London Pro XL plate 01 and Konad white. I also freehanded some roses on my ring finger using Jacava Toffee Apple and Jacava Crimson Crush, with some Barry M Spring Green. I did the dots on my index finger with a Barry M nail art pen.
I hate this look! I like most of the nails individually (ish) but not together. I really like the wide stipes on my thumb - that's my favourite part of the stamping plate I think. I like the index finger, but I don't think it goes with the others. I like the middle finger's narrow stripes, but I really don't like how it makes the nail look not-red. It definitely looked more white than red at arm's length. Plus it looks as though the red has stained badly round the cuticle, or that I haven't cleaned up, and I swear that's not true! I think what happened is that when I stamped, the raised cuticle at the edge created a cushion which meant the white stamping didn't reach all the way to the edge. I don't like my roses at all - the colours don't go with the other nails, there are too many of them, and the leaves are messy. And don't even go there with my little finger! Initially these were nice white dots from the stamping plate, but I thought the nail looked too white, so I dotted more red on. Except that I was too lazy to get my dotting tool, and just used the edge of the brush I used for the roses, and it's a hideous mess.
Oh well, you live and learn! This all came off again straight away.
I hate this look! I like most of the nails individually (ish) but not together. I really like the wide stipes on my thumb - that's my favourite part of the stamping plate I think. I like the index finger, but I don't think it goes with the others. I like the middle finger's narrow stripes, but I really don't like how it makes the nail look not-red. It definitely looked more white than red at arm's length. Plus it looks as though the red has stained badly round the cuticle, or that I haven't cleaned up, and I swear that's not true! I think what happened is that when I stamped, the raised cuticle at the edge created a cushion which meant the white stamping didn't reach all the way to the edge. I don't like my roses at all - the colours don't go with the other nails, there are too many of them, and the leaves are messy. And don't even go there with my little finger! Initially these were nice white dots from the stamping plate, but I thought the nail looked too white, so I dotted more red on. Except that I was too lazy to get my dotting tool, and just used the edge of the brush I used for the roses, and it's a hideous mess.
Oh well, you live and learn! This all came off again straight away.
Labels:
Essie,
FAIL,
flowers,
freehand,
Jacava,
mish-mash,
MoYou London,
polka dots,
red,
stamping,
stripes,
white
Sunday, 23 February 2014
Models Own Hypergels - a Big Fat Fail!
I'm sorry I haven't posted in a week. I've not been feeling great, and I actually had bare nails all week. Today I've been playing with the Models Own Hypergels again in an attempt to get them to work - I bought them a couple of weeks ago, and have been having trouble.
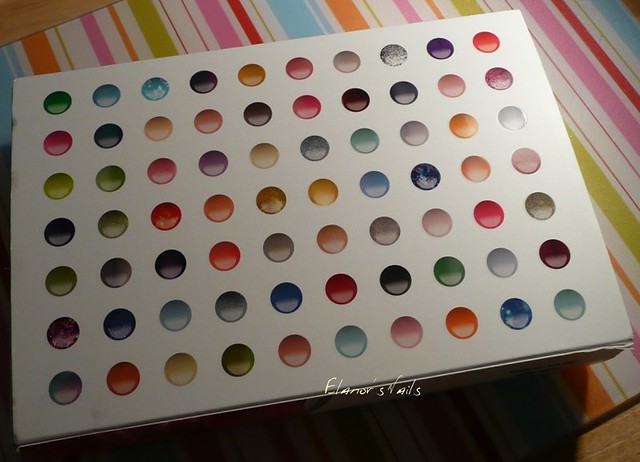
I started with such high hopes! They look stunning on other blogs, so I bought five in the Models Own sale. Isn't the box gorgeous?
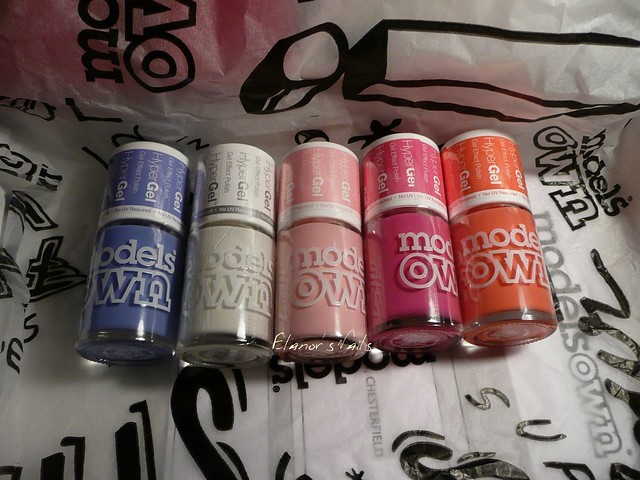
Look at them! Left to right, I have Cornflower Gleam, White Light, Pink Veneer, Cerise Shine and Coral Glaze. Don't they look gorgeous? The colours are really vibrant and the swatches I've seen online look glossy and fabulous.
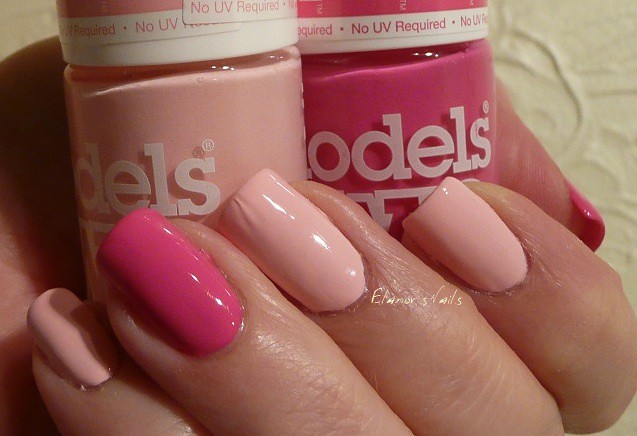
But OH DEAR! I was so disillusioned. The first time out, I tried the two pinks together, I did two normal thickness coats, with no topcoat. They looked lovely, although application was tricky - they were quite patchy going on. But they just didn't dry! As I was taking the photos, the middle finger just crumpled and creased. You can see the start of it here - it got a lot worse afterwards! I took at all this off and put it down to user error.
The next day, I tried the coral. It was really very awkward to apply, and just wouldn't dry at all, even though I left ages between coats. I didn't take photos of that. Then I tried the white, and instead of multiple coats, I tried one generous coat. That refused to dry at all, so I took it off and started again with very thin coats, but that was really hard to apply, and was extremely streaky, so I gave up for a few days.
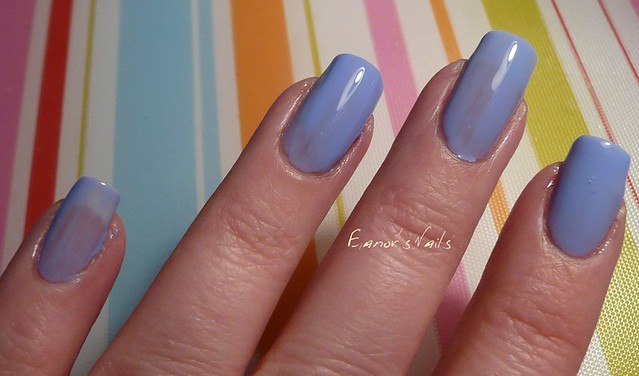
Today I tried the blue one and was exceedingly careful. I applied one very thin coat and left it to dry for over an hour. It didn't look great - as you can see, some nails are barely covered, whereas some look quite thick.
After a good hour (actually nearer an hour and a half) I applied a second thin coat. This looked better, although you can see it's still patchy, and there are some bubbly bits on a couple of nails.
I left this to dry for another hour and a half, and applied a third thin coat. This looked nice. After another half an hour, I thought it would be safe to do clean-up and take photos.
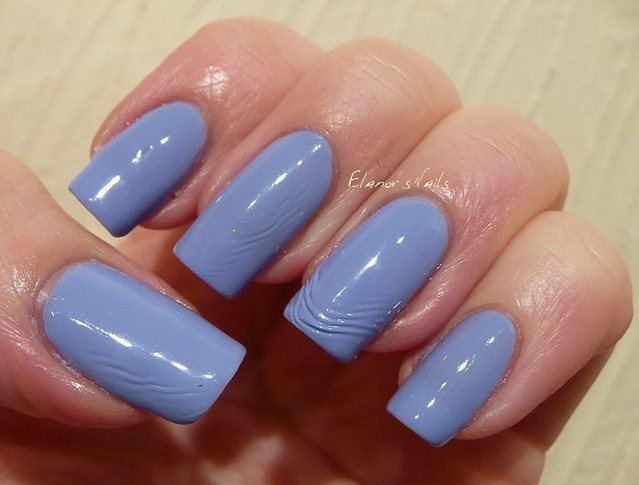
I was wrong. As you can see - it just isn't dry, and the polish slid around on my nails, wrinkling and moving. This happened when I gently wiped my nails dry with a tissue after I'd rinsed my fingers under a tap! I wondered what would happen if I actually put any pressure on them...
Yeah. Don't forget, this is FOUR hours after I started polishing. This is not meant to happen with nail varnish! I wiped all my nails clean with a finger, without any difficultly.
Now, many bloggers have given these rave reviews, and I can see from the nail art that people have posted that obviously this doesn't happen in general. But there is not a chance I could use these in a tape mani, or for stamping, or for gradients. I don't have the patience to sit and wait hours in between each coat, or to faff about any more. The colours are great. Yes, they're very shiny and glossy. However, mine are going into my swap pile. They're not for me - unless someone can fathom what on earth I'm doing wrong??!
I'm really sad! These promised such good things, but there must just be something wrong with my chemistry, as they just don't dry. (And yes, I tried different base coats, no base coats, plus a couple with different topcoats - with not a jot of difference.) I was really surprised, because Models Own are usually really good! I loved the My Midori collection, and the Fireworks glitters are gorgeous, and my favourite gold ever is a MO one (Gold Rush).
I started with such high hopes! They look stunning on other blogs, so I bought five in the Models Own sale. Isn't the box gorgeous?
Look at them! Left to right, I have Cornflower Gleam, White Light, Pink Veneer, Cerise Shine and Coral Glaze. Don't they look gorgeous? The colours are really vibrant and the swatches I've seen online look glossy and fabulous.
But OH DEAR! I was so disillusioned. The first time out, I tried the two pinks together, I did two normal thickness coats, with no topcoat. They looked lovely, although application was tricky - they were quite patchy going on. But they just didn't dry! As I was taking the photos, the middle finger just crumpled and creased. You can see the start of it here - it got a lot worse afterwards! I took at all this off and put it down to user error.
The next day, I tried the coral. It was really very awkward to apply, and just wouldn't dry at all, even though I left ages between coats. I didn't take photos of that. Then I tried the white, and instead of multiple coats, I tried one generous coat. That refused to dry at all, so I took it off and started again with very thin coats, but that was really hard to apply, and was extremely streaky, so I gave up for a few days.
Today I tried the blue one and was exceedingly careful. I applied one very thin coat and left it to dry for over an hour. It didn't look great - as you can see, some nails are barely covered, whereas some look quite thick.
After a good hour (actually nearer an hour and a half) I applied a second thin coat. This looked better, although you can see it's still patchy, and there are some bubbly bits on a couple of nails.
I left this to dry for another hour and a half, and applied a third thin coat. This looked nice. After another half an hour, I thought it would be safe to do clean-up and take photos.
I was wrong. As you can see - it just isn't dry, and the polish slid around on my nails, wrinkling and moving. This happened when I gently wiped my nails dry with a tissue after I'd rinsed my fingers under a tap! I wondered what would happen if I actually put any pressure on them...
Yeah. Don't forget, this is FOUR hours after I started polishing. This is not meant to happen with nail varnish! I wiped all my nails clean with a finger, without any difficultly.
Now, many bloggers have given these rave reviews, and I can see from the nail art that people have posted that obviously this doesn't happen in general. But there is not a chance I could use these in a tape mani, or for stamping, or for gradients. I don't have the patience to sit and wait hours in between each coat, or to faff about any more. The colours are great. Yes, they're very shiny and glossy. However, mine are going into my swap pile. They're not for me - unless someone can fathom what on earth I'm doing wrong??!
I'm really sad! These promised such good things, but there must just be something wrong with my chemistry, as they just don't dry. (And yes, I tried different base coats, no base coats, plus a couple with different topcoats - with not a jot of difference.) I was really surprised, because Models Own are usually really good! I loved the My Midori collection, and the Fireworks glitters are gorgeous, and my favourite gold ever is a MO one (Gold Rush).
Sunday, 13 October 2013
Opi Rock Goddess - Hallowe'en 2013 Set
I'm a sucker for packaging! I saw this set in my local shop the other day and bought it (about £9 I think) without reading any reviews online, which was a bit of a mistake!

I like the packaging(although apparently I can't take a decent photo of it!), and the free bracelet!

These are the polishes. Yellowpalooza, Stand in Lime for Days, Rolling Bones and The Drummer is Hot.

The Drummer is Hot is almost identical to Roll in the Hague, from the Holland collection (although the formula is not as good - more on that later.)

Stand in Lime for Days is almost identical to Fiercely Fiona from the Shrek collection (again, with a less impressive formula).

The formula on these is poor! REALLY poor. The yellow and the green are very thin and streaky, and took at least three coats to be anywhere near acceptable. These coats then just failed to dry. Rolling Bones is quite pretty, but again is very very thin and watery, so took at least 3-4 coats to be wearable. The Drummer is Hot isn't too bad, two coats was enough, but it wasn't anywhere near as good as Roll in the Hague, and was still a bit streaky.

One coat - streaky!

Two coats of The Drummer is Hot (it is still streaky, although you can't really see that here) and three coats of all the others.
I did two manis with these, both of which failed completely. One was a tape mani with colour blocking - but the colours were so sheer that they needed so many coats that they just never dried properly, so the tape lifted up half the colour. The other also just didn't dry, so it dented and smeared about an hour after I finished it. After that, I gave up.
I will wear the bracelet, and I'll probably keep the orange and the grey, but the yellow and the green I think I will pour away so that I can use the bottles for something else. They're THAT bad!
You can buy this set in stores and online for about £10 if you really want to. Or I know where you can get a barely used second hand set for cheap! Lol.
I like the packaging(although apparently I can't take a decent photo of it!), and the free bracelet!
These are the polishes. Yellowpalooza, Stand in Lime for Days, Rolling Bones and The Drummer is Hot.
The Drummer is Hot is almost identical to Roll in the Hague, from the Holland collection (although the formula is not as good - more on that later.)
Stand in Lime for Days is almost identical to Fiercely Fiona from the Shrek collection (again, with a less impressive formula).
The formula on these is poor! REALLY poor. The yellow and the green are very thin and streaky, and took at least three coats to be anywhere near acceptable. These coats then just failed to dry. Rolling Bones is quite pretty, but again is very very thin and watery, so took at least 3-4 coats to be wearable. The Drummer is Hot isn't too bad, two coats was enough, but it wasn't anywhere near as good as Roll in the Hague, and was still a bit streaky.
One coat - streaky!
Two coats of The Drummer is Hot (it is still streaky, although you can't really see that here) and three coats of all the others.
I did two manis with these, both of which failed completely. One was a tape mani with colour blocking - but the colours were so sheer that they needed so many coats that they just never dried properly, so the tape lifted up half the colour. The other also just didn't dry, so it dented and smeared about an hour after I finished it. After that, I gave up.
I will wear the bracelet, and I'll probably keep the orange and the grey, but the yellow and the green I think I will pour away so that I can use the bottles for something else. They're THAT bad!
You can buy this set in stores and online for about £10 if you really want to. Or I know where you can get a barely used second hand set for cheap! Lol.
Friday, 13 September 2013
Broadway Nails Color Changing Stickers
These stickers were part of my birthday present from a friend last week, and I was really excited to try them. Apparently you can buy these in Boots, but I've never seen them, so maybe she has a better Boots than I do!

These are by Broadway Nails, and has two sheets of stickers - one set of colour changing white flowers, and one set of non-changing black and silver swirly bits, stars and butterflies.

The white ones change colour in UV light (sunlight). As you can see though, the change is a little on the subtle side! They change to pale yellow/pink/blues in sunshine. I have to admit that I did not have bright sunshine today, but it was sunshine, honest!
I wore these over China Glaze Tart- For the Party, which is a lovely, pretty lilac with a really good formula. They looked so pretty, but then I had a big fail!

In fact, this wasn't my first fail either. I tried these a couple of days ago, and added Seche Vite, which made the stickers shrivel up and go all funny. So this time, I checked the pack to see that you can definitely use topcoat (you can) and I added a non-fast drying one (this was Sally Hansen Miracle Shine) and a similar thing happened again, as well as bubbles! Argh!

Still, the stickers are really pretty, and the white on lilac look is really nice. Next time I think I just won't bother with topcoat.

I'm not convinced by the colour change aspect of these - it's so subtle that it's almost invisible; or maybe I just need better sunshine!
These are by Broadway Nails, and has two sheets of stickers - one set of colour changing white flowers, and one set of non-changing black and silver swirly bits, stars and butterflies.
The white ones change colour in UV light (sunlight). As you can see though, the change is a little on the subtle side! They change to pale yellow/pink/blues in sunshine. I have to admit that I did not have bright sunshine today, but it was sunshine, honest!
I wore these over China Glaze Tart- For the Party, which is a lovely, pretty lilac with a really good formula. They looked so pretty, but then I had a big fail!
In fact, this wasn't my first fail either. I tried these a couple of days ago, and added Seche Vite, which made the stickers shrivel up and go all funny. So this time, I checked the pack to see that you can definitely use topcoat (you can) and I added a non-fast drying one (this was Sally Hansen Miracle Shine) and a similar thing happened again, as well as bubbles! Argh!
Still, the stickers are really pretty, and the white on lilac look is really nice. Next time I think I just won't bother with topcoat.
I'm not convinced by the colour change aspect of these - it's so subtle that it's almost invisible; or maybe I just need better sunshine!
Saturday, 17 August 2013
Neon Pink Studs - and a Huge Topcoat Fail!
Oh dear! I'm a bit ashamed to share these photos, but I decided to do it anyway, because the original nails looked so nice! This week I received a pack of the Born Pretty Store's new neon studs to review. They have a whole range of gorgeous brightly coloured studs in various colours, sizes and shapes. They will also be doing some wheels of a variety of colours as well. Here I have the 2mm square hot pink studs, item 6968.

As you can see, you get a nice sized bag with plenty of studs. The usual price for these studs is $4.99, but they are currently on sale for only $2.99, which is a huge bargain I think!
I decided that as pink and green are one of my favourite combinations, I'd pair these with two Barry M Gelly polishes, Key Lime (thumb, middle & little finger) and Greenberry (index & ring). I then added the studs using my second Born Pretty Store review item, these fantastic wax pencils, item 3975.

They're designed for picking up rhinestones or glitter and so on, and are just magic! Usually I'd use a cocktail stick dipped in topcoat, but that doesn't always work and can be fiddly, and doesn't work if you don't want topcoat on your stud/rhinestone - for example, if they're matte, or you're applying to a matte base. I was so impressed with this pencil! It's like magic, just touch it to the studs, and it picks them up! These cost $1.99 for two pencils, and I imagine they'll last forever!
My nails looked fabulous. I loved the colour combination. And then I decided to just add topcoat, and THIS happened:

OH NOES!

This has never happened to me before, but I assume it was just too warm, or I had too much topcoat, or something. Anyway, interestingly, my camera totally failed to capture the colours correctly, so I tried my phone camera, which also totally failed, but in the opposite way! The first two photos were taken on my phone: the Greenberry is colour accurate (index and ring fingers) but the Key Lime is far too dark. The second two photos were taken with my camera, and the Key Lime is accurate, but the Greenberry is far too pale! So between them you get the idea of what they looked like, haha!

See? Greenberry looking weird! And bubbles galore!

I was so annoyed about the topcoat fail, because I LOVED how the colours combined and how the studs looked (although a couple are wonky, oops!) and I wanted to wear these all weekend. However, the studs themselves are just gorgeous, and I am a bit inspired for a few other ideas, so hopefully I'll be able to re-post with a more successful look later this weekend. I do wonder if the Barry M Gelly has something to do with it - this is the third fail I've had with these Gellys in the last two weeks (I didn't post the other two because they were so bad!) With one, the colours just wouldn't dry properly at all, and with the other, I used tape and it made the polish lift off completely, which has never happened before.
If you fancy trying out these (or the other colours - click the link above, there are LOADS of great colours!) you can use my discount code to get 10% off any Born Pretty Store order. They also have free postage worldwide!

I received these products for review purposes, but words and opinions are entirely my own. I do not receive anything if you use my discount code, although when it's been used ten times, BPS will let me host a giveaway for my readers! See my Disclosure page for more details.
As you can see, you get a nice sized bag with plenty of studs. The usual price for these studs is $4.99, but they are currently on sale for only $2.99, which is a huge bargain I think!
I decided that as pink and green are one of my favourite combinations, I'd pair these with two Barry M Gelly polishes, Key Lime (thumb, middle & little finger) and Greenberry (index & ring). I then added the studs using my second Born Pretty Store review item, these fantastic wax pencils, item 3975.
They're designed for picking up rhinestones or glitter and so on, and are just magic! Usually I'd use a cocktail stick dipped in topcoat, but that doesn't always work and can be fiddly, and doesn't work if you don't want topcoat on your stud/rhinestone - for example, if they're matte, or you're applying to a matte base. I was so impressed with this pencil! It's like magic, just touch it to the studs, and it picks them up! These cost $1.99 for two pencils, and I imagine they'll last forever!
My nails looked fabulous. I loved the colour combination. And then I decided to just add topcoat, and THIS happened:
OH NOES!
This has never happened to me before, but I assume it was just too warm, or I had too much topcoat, or something. Anyway, interestingly, my camera totally failed to capture the colours correctly, so I tried my phone camera, which also totally failed, but in the opposite way! The first two photos were taken on my phone: the Greenberry is colour accurate (index and ring fingers) but the Key Lime is far too dark. The second two photos were taken with my camera, and the Key Lime is accurate, but the Greenberry is far too pale! So between them you get the idea of what they looked like, haha!
See? Greenberry looking weird! And bubbles galore!
I was so annoyed about the topcoat fail, because I LOVED how the colours combined and how the studs looked (although a couple are wonky, oops!) and I wanted to wear these all weekend. However, the studs themselves are just gorgeous, and I am a bit inspired for a few other ideas, so hopefully I'll be able to re-post with a more successful look later this weekend. I do wonder if the Barry M Gelly has something to do with it - this is the third fail I've had with these Gellys in the last two weeks (I didn't post the other two because they were so bad!) With one, the colours just wouldn't dry properly at all, and with the other, I used tape and it made the polish lift off completely, which has never happened before.
If you fancy trying out these (or the other colours - click the link above, there are LOADS of great colours!) you can use my discount code to get 10% off any Born Pretty Store order. They also have free postage worldwide!
I received these products for review purposes, but words and opinions are entirely my own. I do not receive anything if you use my discount code, although when it's been used ten times, BPS will let me host a giveaway for my readers! See my Disclosure page for more details.
Sunday, 19 May 2013
Elegant Touch Nail Wraps
When the lovely people at Elegant Touch asked me if I'd like to review some of their new nail wraps, I was quite excited, as I've seen these in shops (they're stocked in Superdrug and Boots) and had been very tempted, but wasn't sure I'd be able to get them to work, as I've had zero success with fake nails (they never fit my nails). I wasn't expecting them to send me THREE sets!

Look! Aren't they pretty?! These are 3 sets of the 'bling' nail wraps, which are on sale for between £5 and £7 per pack in Superdrug, although they're sometimes on special offer if you're lucky. Of these three, the Dotty Nude ones were the least appealing to me (they're pretty, but nowhere near as pretty as the other two) so I thought I'd try those first, in case I made a complete hash of it, as I didn't want to ruin the other two packs. And I'm glad I did!

Each pack comes with 18 wraps (a peculiar number!), an emery board, and full instructions. The Dotty Nude set had some wraps with diamante pieces and some with pearly white pieces. I had originally intended to do alternate nails with diamante and pearls, but the sizes didn't work like that. I found it really difficult to get sizes to fit my nails. There were quite a lot of wraps (6 I think!) that only fitted my little nails and were too narrow for all the others, which meant that there weren't enough other sizes to do all my nails. There were some very wide wraps which I cut down to fit my thumb and ring fingers, although that was awkward and fiddly, so in the end I didn't bother with my right hand. The actual application was super easy on the nails that did fit - my little and index fingers. It's just a case of carefully placing the wrap, smoothing it down, and filing off the extra at the tip. I thought my little and index fingers looked great, until I saw the macro shots!

The wraps themselves are fine and soft, easily pliable and easy to remove at the start if you've slightly mis-positioned it on your nail. However, I found that on my ring finger, the wrap just couldn't handle the curve of my nail, and I ended up with that ugly crease at the tip. There's also a notch on the tip of my middle finger where a diamante piece just happened to be on the very edge of the nail. I also found it impossible to cut the wraps neatly down to size to fit my nails, without making a mess of the sides. I was so disappointed with how these looked in the end! It's probably my fault - my nails are an odd size, or my skills are just lacking... There are tiny creases everywhere, which didn't show up much in real life, but which bothered me. In the end, these didn't stay on longer than an hour, and I wouldn't have worn them out because I didn't have enough wraps to do my right hand to match anyway.
I'm gutted! I am pretty sure that many people will love these - the designs are so pretty, and the quality seems really good. I just don't have the nails or the skills to put them on properly. I can't decide whether to try again with the pink ones, or whether to put them in a giveaway for my readers...
These products were provided for my honest review. Please see my Disclosure tab for more information.
Look! Aren't they pretty?! These are 3 sets of the 'bling' nail wraps, which are on sale for between £5 and £7 per pack in Superdrug, although they're sometimes on special offer if you're lucky. Of these three, the Dotty Nude ones were the least appealing to me (they're pretty, but nowhere near as pretty as the other two) so I thought I'd try those first, in case I made a complete hash of it, as I didn't want to ruin the other two packs. And I'm glad I did!
Each pack comes with 18 wraps (a peculiar number!), an emery board, and full instructions. The Dotty Nude set had some wraps with diamante pieces and some with pearly white pieces. I had originally intended to do alternate nails with diamante and pearls, but the sizes didn't work like that. I found it really difficult to get sizes to fit my nails. There were quite a lot of wraps (6 I think!) that only fitted my little nails and were too narrow for all the others, which meant that there weren't enough other sizes to do all my nails. There were some very wide wraps which I cut down to fit my thumb and ring fingers, although that was awkward and fiddly, so in the end I didn't bother with my right hand. The actual application was super easy on the nails that did fit - my little and index fingers. It's just a case of carefully placing the wrap, smoothing it down, and filing off the extra at the tip. I thought my little and index fingers looked great, until I saw the macro shots!
The wraps themselves are fine and soft, easily pliable and easy to remove at the start if you've slightly mis-positioned it on your nail. However, I found that on my ring finger, the wrap just couldn't handle the curve of my nail, and I ended up with that ugly crease at the tip. There's also a notch on the tip of my middle finger where a diamante piece just happened to be on the very edge of the nail. I also found it impossible to cut the wraps neatly down to size to fit my nails, without making a mess of the sides. I was so disappointed with how these looked in the end! It's probably my fault - my nails are an odd size, or my skills are just lacking... There are tiny creases everywhere, which didn't show up much in real life, but which bothered me. In the end, these didn't stay on longer than an hour, and I wouldn't have worn them out because I didn't have enough wraps to do my right hand to match anyway.
I'm gutted! I am pretty sure that many people will love these - the designs are so pretty, and the quality seems really good. I just don't have the nails or the skills to put them on properly. I can't decide whether to try again with the pink ones, or whether to put them in a giveaway for my readers...
These products were provided for my honest review. Please see my Disclosure tab for more information.
Saturday, 5 January 2013
Rainbow Nails - Oops
I love seeing rainbow nails on other blogs. I love how bright and vibrant and happy they are. I've been keen to do my own for ages, but was put off by the thought of them being fiddly...
HA! They weren't just fiddly, they were ridiculously fiddly, and I only did my ring fingers! I like that these are bright and happy, but oh dear, I do not like the untidiness of the lines.

I didn't use tape; I tried to freehand these. I should not have done! Oh well. They look fine from a distance, but I am not happy.

I used Barry M Cyan on the plain fingers, and the rainbow is made up of Gelly Blood Orange, Block Orange, Bright Yellow, Spring Green, Cyan, Cobalt and Bright Purple (over a white base).
HA! They weren't just fiddly, they were ridiculously fiddly, and I only did my ring fingers! I like that these are bright and happy, but oh dear, I do not like the untidiness of the lines.
I didn't use tape; I tried to freehand these. I should not have done! Oh well. They look fine from a distance, but I am not happy.
I used Barry M Cyan on the plain fingers, and the rainbow is made up of Gelly Blood Orange, Block Orange, Bright Yellow, Spring Green, Cyan, Cobalt and Bright Purple (over a white base).
Sunday, 1 July 2012
Nails Inc Jubilee - Total FAIL
Oh dear! I was looking forward to using this beauty!
First I couldn't decide what colour to use as a base (I thought a base colour would mean I could use less glitter) so I used a variety of red, white and blue.

The red is Barry M Retro Red, the white is China Glaze Frosty (I bought this recently for a jewellery project, thinking I'd never wear it as a mani, but I actually think it looks really pretty on the nail) and the blue is Nails Inc Baker Street. I bought Baker Street for my American nail twin friend, but I don't think she'll mind me swatching a couple of nails before I post it! Baker Street is lovely - this is one coat. It's rich and creamy, very smooth, and has lovely even coverage. I might need to buy myself one of these too!
Then I added one coat of Jubilee. This is a Nails Inc Limited Edition, that comes with a gorgeous sparkly crystal cap. This is densely packed red, white and blue glitter in a clear base. I hadn't cleaned up here, because I was planning a second coat.

I liked how one coat looked, but wasn't mad keen on the base colour showing through, so I added another coat. It was so sparkly that I dashed outside to take some photos in the brief moment of sunshine, so again, apologies for the mess round my cuticles. The glitter is so dense that this wasn't particularly easy to apply without making a mess.

I then waited a while for this to dry, added some topcoat and waited a bit more. I then had some lunch, did some washing up, put away the ironing... and then decided to rub in some hand cream before taking the 'proper' photos for the blog... and this happened!

Oops! First one nail's polish just slid off totally, all in one piece. The glitter felt dry, it just felt as though the base colour was totally wet still. Very odd. As a test, I poked some of the other nails, and they all came off!

First I couldn't decide what colour to use as a base (I thought a base colour would mean I could use less glitter) so I used a variety of red, white and blue.
The red is Barry M Retro Red, the white is China Glaze Frosty (I bought this recently for a jewellery project, thinking I'd never wear it as a mani, but I actually think it looks really pretty on the nail) and the blue is Nails Inc Baker Street. I bought Baker Street for my American nail twin friend, but I don't think she'll mind me swatching a couple of nails before I post it! Baker Street is lovely - this is one coat. It's rich and creamy, very smooth, and has lovely even coverage. I might need to buy myself one of these too!
Then I added one coat of Jubilee. This is a Nails Inc Limited Edition, that comes with a gorgeous sparkly crystal cap. This is densely packed red, white and blue glitter in a clear base. I hadn't cleaned up here, because I was planning a second coat.
I liked how one coat looked, but wasn't mad keen on the base colour showing through, so I added another coat. It was so sparkly that I dashed outside to take some photos in the brief moment of sunshine, so again, apologies for the mess round my cuticles. The glitter is so dense that this wasn't particularly easy to apply without making a mess.
I then waited a while for this to dry, added some topcoat and waited a bit more. I then had some lunch, did some washing up, put away the ironing... and then decided to rub in some hand cream before taking the 'proper' photos for the blog... and this happened!
Oops! First one nail's polish just slid off totally, all in one piece. The glitter felt dry, it just felt as though the base colour was totally wet still. Very odd. As a test, I poked some of the other nails, and they all came off!
I can't understand why the the eating, washing up and laundry didn't affect it, but oh well. Next time I might just use the glitter on its own.
Saturday, 23 June 2012
Argh!
This was my lovely mani for most of yesterday:

I am ashamed! This started out as Deborah Lippmann Forget You, which looked lovely and black and sparkly and rocky, with a matching Forget You ring. After a few hours queueing in the torrential rain, and a few hours bouncing around waving my hands in the air, somehow most of my polish had peeled off, I'd lost the big cabochon on my ring, I was covered in ink and the wrinkles in my fingers were totally prune-worthy due to the soaking.
It was totally worth it though!
Labels:
awful,
black,
Deborah Lippmann,
FAIL,
jewellery,
springsteen
Subscribe to:
Posts (Atom)