Today's nails are some autumnal dots, using several different polishes.
I started with a base of two coats of Barry M Butterscotch Sundae. I then used dotting tools to add curved rows of dots using Barry M Cocoa, Chilli, Mustard and Twinkle Twinkle, and OPI DS Luxurious.
I topcoated over everything for extra shine and longevity. I wore these to work for a couple of days, and really liked how they looked.
Yesterday was Shakespeare's birthday, and the 400th anniversary of his death. I go to the theatre a lot, and love a bit of Shakespeare, so I did nails.
I started these with a base of a splodged on mix of three beigey-nude colours. I needn't have bothered, as they were so similar I should just have painted them one of the colours. I had been aiming for a sort of parchmenty unevenness to the colour. Oh well.
I then stamped using three different MoYou London plates. The skull was Rockstar 01 and Konad Black, the script was Scholar 02 and Barry M Cocoa, the quill was also Scholar 02, with Konad Black, and the roses were from Pro XL 26 and Colors by Llarowe The Heart Bleeds. I added matte topcoat to all the nails except the one with the roses, because I wanted them to look sparkly. It isn't hugely obvious, but the text is the opening of Romeo and Juliet.
I fell in love with the MoYou London Steampunk plates, and bought two of them. However, I'm not quite sure what to do with them!
Today I used a couple of metallic autumnal shades and the XL plate 01, with a few tiny studs. I'm not convinced by the whole look. It's nice, but it doesn't blow me away.
I used OPI's Germanicure by OPI and China Glaze Harvest Moon. I stamped using my very precious and diminishing Barry M Gold Foil. The studs are stuck down with topcoat.
I really like the clock design on my thumb! The gold isn't a high contrast with the China Glaze polish, so in hindsight I'd have used black to stamp on those nails.
Today I got the urge to do an autumnal watermarble! This was done with all Barry M Gelly colours.
I'm really happy with how this turned out!
I've used Mustard, Mango, Paprika and Cocoa, which I think work really well together.
What do you think?
I am SO excited about this post! Having seen the truly gorgeous water marbled nails out there, I've wanted to be able to do this for so long. I've tried multiple times previously, and just ended up with a huge gloopy mess of revoltingness. I'd given up. Then today I found this wonderful post at Lacquerish, and I felt all inspired to try again. In particular, she pointed out some common errors, most of which I'd been doing! I tried again, and hey presto!
I started with a base of Barry M Coconut, and then got to work. I used Mushroom, and 3 Gellys - Paprika, Cocoa and Lychee - to get this look.
While is hasn't come out perfectly (there are a couple of bubbles, and I caught my little finger nail with the tip of the cocktail stick), I'm thrilled with how this came out. It worked exactly as the tutorials say it should! Like magic!
My cleanup on this isn't the best, but I'm not hugely bothered, as I'm so chuffed with my results. The bits round the edges will neaten up after I've washed my hands and used hand cream a few times, and had a night's sleep, so they'll be looking better tomorrow morning.
On the cleanup note - I do NOT recommend PVA basecoat as a shield on your fingers! I did most of my fingers using a good dollop of handcream as a barrier to stop mess, and it worked well. Then I wondered about PVA peel off glitter basecoat and tried that on the last couple. Oh dear oh dear! Not a good plan. Very messy. I suppose it's because it's water-based, so doesn't go well with dipping in water!
Another happy thing about today - the sun was out! And it was out long enough to take some photos outside! It's starting to just about feel as though spring might be on the way one day!
Today I have another new brand for you! Nella Milano is a new company - you can see their website here, where all their polishes are for sale. I love the range of colours on offer - they look so bright and zingy and pretty!
I have two to show you, Mercury Haze and Chestnut Road. Strangely, out of all the colours I already have, both of these are sort of unique in my collection! First up is Mercury Haze, a pretty grey.
This is really nice grey. I think it has a greeish edge to it, which makes it quite different to other greys I've tried. It's a very slatey grey, which I like!
This is two coats of Mercury Haze. I added topcoat, because I wore it to work for a day, but it didn't really need it, as it's really glossy already.
I also wore this for another three days with stamping over the top (see my previous post), and I can confirm it wore really really well, no chips, peels, tip wear or anything else.
My second colour is Chestnut Road. I first thought this would be a blood red vampy colour, but with the second coat it's definitely more of a rich chocolate brown, with reddish tones.
Isn't it gorgeous? This colour really is right up my street!
This was almost a one coater, although I did two for perfection. This is with topcoat, but again, it really doesn't need it.
The bottles are nice - they look elegant and simple, and I like the swirly pattern on the lid. The brushes are really nice - narrow (which is definitely my preference) and quite firm, and comfortable to use. The formula on both of these was excellent - thin, without being runny or streaky, no pooling round the cuticles, no lumps, bumps or splodges. Both were beautifully even and smooth, and dried very quickly. I'm really impressed! These sell on the Nella Milano website for £8.95 each, which is in the OPI/China Glaze price range. They don't have the colour range of either of those brands (yet) but of course, this is a brand new company. I think the quality of the polish is just as good though, and the brush is definitely far nicer for me than the OPI one, which I find far too wide.
You can follow Nella Milano on Facebook here, where they have just released a special offer! For the next 5 days, you can get 50% off any order! I think that's a total bargain, so I've got my eye on quite a few colours there!
You can also follow Nella Milano on Instagram, Twitter and Pinterest.
These polishes were provided for my honest opinion. See my Disclaimer section for more details.
I live in Chesterfield, in lovely Derbyshire, and I love it here. This week I was feeling very uninspired for nail designs, but then on Monday I saw a competition to make "something" inspired by Chesterfield, which gave me some ideas! It may well not be what they're wanting, and it's not about winning, but at least I got some inspiration!
If you don't know Chesterfield (and you probably don't!) then it's a smallish town near the Peak District, and the most famous thing is the Crooked Spire, which you can see from the train if you're going THROUGH Chesterfield, which if you've ever travelled north-south in England, then you've probably done. But there's more to Chesterfield than the Crooked Spire!
So here are my inspirations:
The Crooked Spire:
Linked to this, the logo of my workplace (although we often use this in lime green):
Photo credit: Chesterfield College, chesterfield.ac.uk
The historic market:
Photo credit: chesterfield.gov.uk
The half-timbered buildings of Knifesmithgate:
Photo credit: geograph.org.uk
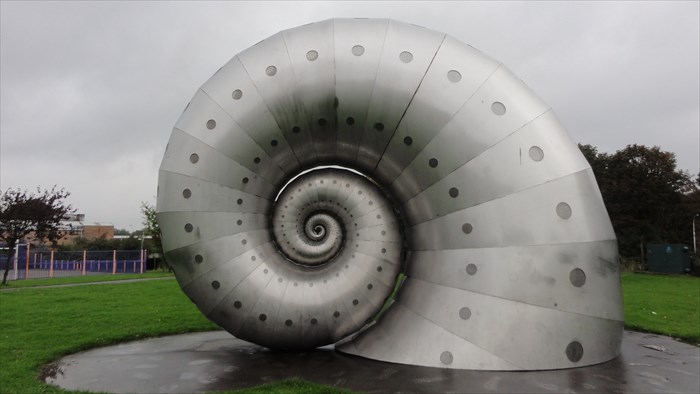
The super cool snail sculpture. This is a sculpture by an artist called Liz Lemon, and can be found near the train station.
 Photo credit: Waymarking.com
And of course, the football team!
Photo credit: chesterfield-fc.co.uk
And here are my nails!
I used a base of Barry M Pearl on my little, ring and middle fingers, a base of Barry M Mist on my thumb, and Barry M Blue Grape on my index finger.
Photo credit: Waymarking.com
And of course, the football team!
Photo credit: chesterfield-fc.co.uk
And here are my nails!
I used a base of Barry M Pearl on my little, ring and middle fingers, a base of Barry M Mist on my thumb, and Barry M Blue Grape on my index finger.
I then painted the snail freehand using a fine brush and OPI Push and Shove. I accented this with Barry M nail art pens in black and white. I also used the Barry M pens to do the CFC logo on my index finger. I didn't add the red that's in the proper logo, as I don't have a fine enough brush to do this or a red nail art pen.
I used She Sells Seashells straight stencils to make the chevrons for the market stalls, using Barry M Spring Green. I painted the spire and the frame round it using Barry M Key Lime and a fine brush. The little finger is a bit messy! I used Barry M Cocoa, and a fine (not fine enough!) brush. I wasn't thrilled with how that one in particular turned out, but I suppose the half timbered buildings are a bit rustic too...
These weren't hugely successful! Most of my colleagues didn't know what most of this was meant to represent - EVEN THE ONE THAT IS OUR WORK LOGO! Oh well, at least I had fun!
Today's nails are an autumnal colour combination, using more She Sells Seashells chevron stencils.
The orange nails are two coats of Essence Flashy Pumpkin, with a stud from the Born Pretty Store added as an accent.
The other nails are a base of two coats of Models Own Coconut Cream, and then the stencils used with Barry M Cocoa.
I love these stencils - they're so easy to use, and so much better than sellotape, as they're that bit stronger, and less sticky.
I recently won a couple of prizes in the huge Digital Dozen giveaway! I never win anything! I was thrilled to learn I'd won some UK indie polishes - I've never tried any before, and I was really excited. I won a full size polish from Laquerdaisical, and being addicted to thermal polishes, I immediately chose Jaffa Fake, which I'd seen on Kerruticles' blog and had been lusting after ever since.
First up - I LOVE THE NAME! I love Jaffa Cakes. I love puns. It's a winner.
Jaffa Fake is a dark brown jellyish polish, which is a gorgeous chocolate brown when cold, and a lovely jelly orange when warm. There's also a really pretty purpley gold shimmer in there too, which is particularly noticeable when the polish is darker.
This is three coats of Jaffa Fake, with topcoat. The polish is quite sheer, especially when warm, so it could be worn with a creme base underneath. I really like it like this though.
Here it is cold:
(It was really hard to get a photo of it all-brown! I've been boiling hot recently, and my hands won't stay cold long enough to get from the cold tap to the camera!)
Getting warmer:
Warmer:
Isn't it gorgeous? I really like brown polishes. I love orange. I REALLY love thermals. So this is a total winner for me.
I don't know why I've never tried any indie polishes before! I know I hate PayPal and that puts me off a bit, but I have used PayPal successfully so that shouldn't really be something to put me off... Anyway, now I've tried one, I'm keen to try more, so come next pay day, there'll be stopping me!
Laquerdaisical polishes are made by Alexia, and can be bought from her online shop or over on her Facebook page.
I won this polish in an online giveaway.
I bought this stamping plate some time ago, but was waiting to use it because it seems really autumnal to me! It's MoYou London Mother Nature 09, which you can see in full here. I really love the ears of corn and wheat design.
I started with a base of Barry M Truffle, from the Silks collection. I then stamped using a variety of the new Autumn Gelly colours Mustard, Paprika and Cocoa.
This didn't turn out quite how I'd hoped, although I do really like how the thumbnail looks!
The middle finger especially came out messier and less distinct than I wanted.
I do really like how good the Gelly range is for stamping though. They're thick and highly pigmented and carry a design really well.
I'll have to try using this plate again another time and see if I can get the end result more how it was in my head. In the meantime, I quite like bits of this...
So after a morning tidying up my nail desk (see post here!) I finally got round to actually painting my nails! It's been almost a week since I did anything worth posting. Today I wanted to finally get round to trying more of the Barry M Autumn Gelly colours, so I started with Cocoa. Cocoa is a gorgeous, dark, chocolately brown. This is two coats.
The formula is great - opaque, smooth, even and glossy. Really lovely. I decided to pair this with some really lovely studs I have been sent for review from Born Pretty Store.
Just look at them! Aren't they fab? There are circles and squares of various colours. There's a gold coloured base, and then a super shiny, glowy coloured centre. I decided just to stick with one colour for this look, and used the orangey brown ones.
I love how this looks! The contrast between the gold metal border and the coloured middle looks so fancy! I really like the bullseye effect.
The studs themselves are light, and stick down very easily with topcoat.
These studs are on the Born Pretty Store website as item no 15332, and cost $5.32 for the whole set. I really like them, and can think of loads of looks I want to try out.
You can also get 10% off this price using my AKJ61 discount code at the till.
These studs were provided for review purposes. See my Disclaimer section for more details.